Showing posts with label bread. Show all posts

Wednesday, February 12, 2014

Seeded Sourdough Bread


Have you ever seen anything so beautiful? Well, when you're nervously trying to culture your own leaven and make your first sourdough loaf, this is indeed a sight to behold. This leaven was alive and active and ready for action. 

This is my second attempt at making sourdough bread. 

Six months or so ago I started making my own leaven but because I neglected to care for it and feed it regularly, it kind of died. I threw it out and put off trying to make one again.  

So when Jane, the sourdough expert in my circle of friends, offered to give me some of her well-matured leaven, I accepted without hesitation and promised to care for it and feed it well.

I did. I fed it for three days and used it on the fourth day.  

[If you want instructions of making and feeding your own leaven, I suggest you read Jane's very detailed post on her blog, The Wayward Oven].

[A sourdough starter isn't difficult to make but it requires time and attention. All you need is a clean jar with a lid, some flour and water. And some patience for you have to feed and replenish it daily for six days or seven before it is ready for use. As it develops, the starter will collect the spores of airborne yeast which is what gives the starter it's character and flavour.]

I was very nervous, making sure I read the recipe (I adapted Jane's recipe for a seeded Sunflower Bread which she adapted from a Dan Lepard recipe) carefully and followed it closely.

I'd only ever used commercial yeast before and while I am confident when making breads with dry, active yeast, this was my first go at using a leaven. I wasn't sure what to expect - how would the dough rise, how long should it take to rise, how should it look when it's risen enough?

So, yeah, I followed the instructions of the recipe to the T.

[Of the started you create, you use only a small portion - about 100g or so, depending on the recipe - for the bread. The remaining 100g or so you keep and feed for future use]

I had to knead the dough briefly in two ten-minute intervals before leaving the dough to rest for an hour, to rise.

After an hour, the dough barely rose and I was panicky. Was it not working? Worried, I decided to just continue on - I was to shape the dough into a round and place it in a proofing basket or a floured kitchen cloth and place it in a deep bowl to rise further, for 1.5 hours.

I waited. Anxiously. Peeping in every 30 minutes or so. Yeah, I was a Nervous Nelly alright.

[I must mention that I woke up at 5am to start on my bread. It was 8am and I couldn't wait to see the dough after the second rise.]

I peeked inside the cloth again and was pleased to see it had risen. Not as much as I'm used to with the dough that uses commercial yeast, but it had risen. Surely that was a good sign. Perhaps leaven takes longer to rise, allowing the flavours to develop slowly?  [I consulted Jane later and she confirmed that for a bigger rise, more time is needed. So I made the loaf again later in the day and let it rise for longer - about 4 hours - and true enough, the rise was significantly more and the flavour superior.]

Pleased with the moderate rise (or rather, because I couldn't wait to taste this bread), I proceeded to bake it.

I preheated my oven to 220C. Instead of placing the shaped bread on a baking sheet, I decided to bake it in my saucepan (I've done it before and it comes out lovely). So I placed the saucepan (stainless steel) in the oven to heat up. 

After 10 minutes, I removed the pot and carefully transferred the shaped dough into the pan, seam side down. I put it in the oven and waited. It took about 30 minutes for the bread to be baked. 


Whoooopp! Yup. I think I half-yelped as I took the pot out and saw the lovely crusted dome in the saucepan. What do you know! It looked beautiful. Nice and crusty [the sourdough crust is part of what makes it so popular and sought-after - nicely crisp and crunch] ... and it smelt divine. I couldn't wait to cut it open and peer ... no, gaze ... no gawk at the inside of my bread.

I cut it while it was still hot (after photographing it, of course) and it was glorious. It was still steaming and it smelt .... yes, once again, divine. Delicious. I knew it would taste great too. I just knew it would.

And it did. The pumpkin seeds (the original recipe called for sunflower seeds but I love pumpkin seeds and decided to swap) were a yummy addition and added crunch and flavour to the already tasty bread.

For the recipe and the very detailed instructions, head on the The Wayward Oven.


I called Jane immediately (well, a little later as I didn't think she'd appreciate a call from a howling, screeching me so early) and thanked her profusely for her starter and her recipe.

Even Mojo, my 12-year-old dachshund kept sniffing at the bread on the dining table and though he's on a strict diet (the vet says he's 1.5 kg overweight - for a small dog, that's a LOT) I gave him a tiny piece of the bread. He loved it (but then again he loves anything edible. Or even inedible).

The bread didn't last a day - I let a few friends and colleagues sample some and I ate the rest for dinner. It was too good to keep!


Sunday, October 27, 2013

Onion and mushroom stuffed bread


So, it's November already (how ridiculous is that???) - my dog just turned 12 (yes, he's growing old - boohoo) and I recently turned ... well, I'm not telling how old I am although some days, I feel as if I'm 102 (especially everytime my knees crack when I squat to get something from a low shelf!). 

Needless to say, I've been feeling a little dreary. I was in dire need of something to pick my spirits up.

A stiff drink would've worked but I needed something stronger. 

I needed to make bread.

It's been ages since I last made anything other than a five minute (ok, maybe 15 minute) salad. So when Jane of The Wayward Oven brought a super tasty spider bread (a garlic and cheese bread shaped into a giant spider - we were doing a Halloween food shoot in the office), I was motivated to get back to bread baking. 

I liked Jane's bread which she made from a buttermilk and egg-enriched dough. I decided to use her recipe (and her idea of making a stuffed S-shaped loaf) and make my own stuffed bread.

Jane used two fillings: salted fish pickle (paste) and garlic and oven-dried tomatoes. Doesn't that sound super? I didn't try thinking of a vegetarian alternative to salted fish - there really is no equivalent, I think. 

I decided on onions for my first filling and mushrooms for my second. 


I blanched some red onions, chopped them up roughly and pureed them before mixing the paste with some rosemary.

For the second filling, I minced some mushrooms and sauteed them with some garlic and then added some sliced brussel sprouts. The sprouts are optional, really; mushrooms and garlic alone would be great too.

The onion paste was a little wet and I was worried that the moisture from the paste may affect the outcome. I started to panic a little, especially when shaping the stuffed dough into an S-shape on the baking tray: the paste oozed out in places, making the dough a little stodgy. 

"Oh my god," I yelled inwardly. "I'd messed it up!"


So, with the remaining dough (there was enough dough to make two medium-sized loafs) I decided to play safe and make a stuffed round dome - like a boule. 


Well, as it turned out, the onion paste didn't ruin the bread at all. If anything, it added moisture to the crumb and what I ended up with was a moist, tender bread that was deliciously onion-y. 


I was especially thrilled to see the pink of the onions peeking through the insides of the bread, a lovely contrast to the dark mushroom and brussel sprout filling. The two went fabulously well together too! Oh joy!


Onion and Mushroom Stuffed Bread

For the bread (adapted from the wayward oven)
350g bread flour
11/2 tsp active yeast
1 tbsp sugar
2 tsp salt
1 tbsp oil
200ml buttermilk
1 egg

For the onion paste
3 medium red onions
2 sprigs of rosemary

For the mushroom (and brussel sprout) filling
3 cloves garlic, minced
10 button mushrooms
6 brussel sprouts
salt and pepper
2 tbsp olive oil

Whisk together the flour, salt and sugar. Add the yeast and mix it in. Heat the buttermilk until it starts to simmer. Take it off the heat and lightly beat in the egg and oil. When the temperature has cooled slightly (enough for you to stick a finger in for 10 seconds), pour the liquid into the flour mixture gradually and bring together to form a dough. Knead the dough for about 5 minutes until it becomes nice and smooth. Cover and leave for 10 mins. After 10 minutes, knead again about 8-10 times and cover for another 10 minutes. Repeat twice and then cover with a tea towel and leave the dough to rise for about 60 mins.

Drop the peeled onions into a pot of boiling water and blanch it for about 5-7 mins. Drain, roughly chop and puree to a paste. Add the rosemary, stir and let it sit - covered.

Heat a pan of water. When the water boils, add the brussel sprouts and let it cook for about 5 mins. Drain and slice thinly. Mince the mushrooms roughly. Heat the olive oil in a skillet and add the minced garlic. Add the minced mushroom and cook under a low fire until the moisture evaporates. Add the sprouts and mix. Season and take off the heat.

Once the dough has risen, gently punch it down to deflate. Divide the dough in two (or you can make one large loaf).


For the S-loaf, gently roll the dough out into a rectangle with the longer side facing you. Spread the onion onto half the rectangle. Fold the other half (the half without the filling) over the onion paste. Now, spread the mushroom filling on top of it.

Pre-heat the oven to 190C.

Turn the dough around so that the longer side of the rectangle is facing you.
Roll the dough up (from the side nearest you) into a log (as you would a swiss roll). Roll it as tight as you can. Seal the seam as well as you can. Now, shape the log into an 'S'. Let the S-shape dough rest for about 15 minutes.

Bake for 30-35 mins or until the bread browns on top and is cooked through.


For the stuffed boule, simply roll the dough into a round. Spread the paste in the middle of the dough and then spoon in the mushroom filling Fold the edges of the circle around the fillings and seal the dough into a nice round parcel. Smoothen the dough into a nice ball and let it rest, seam side down, for about 15 minutes.

Bake for also around 30 mins.


Monday, February 11, 2013

A Wholemeal Loaf And Pea Soup


I choose wholemeal bread over white bread when I want less starch in my diet. Wholemeal or wholegrain bread contains the nutrient-rich bran and germ of the wheat berry as well as the endosperm (the starchy component) and is therefore healthier than white bread than only includes the endosperm. Great to know. The problem, as with many healthier options, is that whole wheat bread TASTES healthier. Now I am not one who believes that food that is good for you has to taste bad. But let's be frank: wholewheat bread is almost never tastier than its starchier counterpart. (Those pre-packed industrial breads from the supermarket don't count because chemicals can make anything taste good).

So, imagine my surprise when this wholemeal loaf I baked tasted .. absolutely delicious. Admittedly, I mixed in white flour with wholemeal flour. I do this with all my wholemeal loaves because using 100% wholemeal gives me a loaf that is just too dense and too chewy -- not something I like, really. Having said that, I read an article by New York Times columnist Mark Bittman just three days ago about three reasons why his 100% wholewheat breads are "delicious". First, he says, is because he uses the food processor; Second: he allows his dough an overnight rise, allowing the bread to develop flavours slowly (at least 12 hours); Finally: he uses a sourdough starter.

Since I've only recently begun my sourdough starter (mine is just three days old - I have to wait at least another four days before I can use it in my breads), I will have to wait a little to follow Bittman's theories out.

For now, I settled on making wholemeal bread with my new favourite bread making method. Yes, I used the tangzhong method.  


I wanted to see if the tangzhong method would work with wholemeal loaves as well as it does with white bread. I pretty much followed the original recipe: the roux is the same but I adjusted the measurements for flour (divided it to 50% white flour and 50% whole wheat) and liquid (added 30% more water) for the dough.

As I've posted recipes using the tangzhong method a couple of times already (you can check them out here and here and here -- can you tell I am obsessed?), I've added a second recipe in this post: one for a Pea Soup, which goes perfectly with the bread once it has "aged" (i.e. after a day or two). Yeah, I was feeling a little guilty about repeating the basic recipe so many times and posting just variations of basically the same recipe on this blog!

So first, let me share my modified tangzhong recipe.

Rosemary and Chilli Wholemeal Bread, Tangzhong style
Roux (same as the original)
4 tbsp (30g) bread flour
60g milk
60g water

Combine ingredients until incorporated, with no lumps. Hear over a low fire, stirring constantly until the mixture thickens to resemble that of mayonnaise. Cool to room temperature.

Dough
175g whole wheat flour }
175g bread flour             } The original calls for 350g bread flour
4 tbsp sugar
1/2 tsp salt
1 tsp instant yeast
2 tbsp chopped rosemary (fresh) {optional, not in the original}
1 tsp chilli flakes (depending on the heat of your chillies. Mine are potent)  {optional}
80g milk       }
70g water     } The original recipe requires 120g liquid (milk + water)
1 egg
30g butter, softened

Whisk the flours, sugar and salt together. Add the yeast and mix. Add the roux and the egg and, suing your fingers, mix them into the flour mixture. Add the water gradually until a rough dough forms. Cover and let sit for 10 mins.

Add the butter, rosemary and chilli and using your hand, knead the ingredients into the dough until well distributed, about 3 mins. Cover and let the dough rest for another 10 mins. Repeat the kneading (3 mins) and resting (10 mins) process a further 3 times. After the last knead, cover the dough and let it rise until double its size, about an hour.

After an hour, gently knead the dough a couple of times, shape it, place it in the loaf pan and bake in a preheated oven (180C) for about 30 mins.

The bread is gorgeous. So tasty and soft, with  a slight crust. The rosemary and chilli are subtly present but the main flavour is unmistakably the wholemeal. And, it tastes great. I love it. Not just like it because I know it's healthier. No, I really love it.


Next, the Pea Soup. Why Pea Soup? Well, as a self-confessed TV addict, let me admit that I saw this made on TV on the latest season of Top Chef. I'd never thought of making Pea Soup before but when contestant Sheldon Simeon made it, I earmarked it and immediately wanted to make my own version of Pea Soup.

Why haven't I tried this before? It's absolutely lip-smackingly good.

I used frozen peas,  which are the next best thing to fresh peas. Canned peas are great but they lack the inherent sweetness of green peas somewhere along the canning process and are therefore not the best choice for this soup.

I like my soup nice and thick but, if you prefer a thinner consistency, add more water than what I suggest in the recipe. The soup is best eaten cool or cold. With a nice slice of day-old bread bread, toasted and cubed if you like, this soup is a keeper.


Easy Peasy Green Pea Soup
2 cup frozen peas, defrosted
2 stalks of leek, sliced thin
30g butter
2 cups stock + 1/2 cup water (or 1/4 cup milk)
2 sprigs rosemary, chopped fine
salt and pepper to taste

2 slices old bread, toasted and cubed


Heat the butter in a saucepan. Add the leeks and cook till soft. Add the peas and stir to coat them in the butter. Let the peas cook for about 5 mins. Add the stock and water and leave to boil, on low heat. 

When it comes to a boil, turn the heat off and puree the contents with a blender.  

Once pureed, the soup becomes nice and creamy and thick (and a beautiful, vibrant, green) put it back on the heat. Add the rosemary and seasoning and cook till it begins to boil.

Turn off the heat and let the soup cool. 

Serve only when the soup has cooled. Or, chilled(for at least 30 mins once it has cooled). Dunk the pieces of bread in and soak it in the thick soup. Amazing!


Saturday, February 9, 2013

Milk Loaf Full of Corn


I've been in search of the perfect loaf of corn-flavoured bread for a long, long time. When I was a child, my parents used to buy loaves of fluffy corn bread from a bakery quite close to where we lived in Penang. It was the only thing I'd willingly eat for breakfast - I used to detest eating breakfast, particularly in the wee hours of the morning before leaving for school slightly before 7 in the morning. But for all the fuss I'd make over swallowing the half-boiled eggs my mum prepared,  I gladly ate a slice or even two of this deliciously soft bread. Selective eating, even back then I guess.

Since we moved away from Penang many, many years ago, I haven't sampled anything close to the bread I remembered, and not for the want of trying either. I even tried my hand at making the classic American cornbread hoping that it would be similar --  it turned out well but it wasn't the bread I loved from my younger days. I was beginning to think it was a figment of my wild imagination. You know, when you're a kid who makes up stories, the lines between what's real and what's not becomes very blur.

But when I discovered the Tangzhong method of baking bread a month or so ago, I saw a glimmer of hope. The light at the end of the tunnel, so to speak. The Tangzhong bread is soft and fluffy and ever-so-slightly sweet, much like the texture and flavour of the corn bread I longed for. And, with the addition of custard powder in the water-roux (the roux is the hallmark of the method), it even has the same shade of yellow as the original corn bread. All I had to do, perhaps, was to add some corn into the dough. I had some frozen corn kernels in the freezer so I thought I'd give it a shot. 


Prior to this, I'd only made buns using the tangzhong method, simply because soft rolls were nice and easy to binge on. This time, I decided to make a loaf. 

Start by making the roux. I used custard powder in the rough as I wanted the corn flavour (a main element in custard powder is corn flour): 2 tbsp bread flour, 2 tbsp custard powder and 120 ml liquid (half milk, half water). Mix the ingredients and heat over a low fire until it thickens (to the consistency of mayonnaise, almost). Leave the roux to cool.

Next, mix the dry ingredients together: 350g bread flour, 2 tbsp milk powder, 4 tbsp sugar, 1/2 tsp salt, 1/2 tsp instant yeast. 

Once the roux has cooled to about room temperature, add about 120g or 80% of it to the dry ingredients, along with an egg. Using your fingers,  gently mix the ingredients together.

Next, add the liquid: 80ml warm milk + 40ml warm water and mix until you get  a rough dough. Cover the dough with a tea towel and let it rest for ten minutes.

Have the corn, defrosted and cooled to room temperature, standing by, along with about 30gm butter, softened. 


After allowing the dough to sit for 10 mins, add the butter and the corn and gently knead both ingredients into the rough dough until you get a soft, smooth dough, about 2-3 mins. Leave the buttery dough to sit for yet another ten minutes, covered with the tea towel.

When the ten minutes is up, I knead the dough again for a couple of minutes before resting it a further 10 minutes. Repeat this another two more times before finally allowing the dough, now nice and pliable, to rest and rise till it doubles in size: about an hour. (See the rise in the pics above).


Once the dough has risen and doubled in bulk, gently knead it for a minute and then transfer it onto a lightly floured surface. 

Divide the dough into three equal portions. One by one, gently stretched the dough into a rectangle, with the longer side facing you. Mentally divide the rectangle into thirds and then fold the left side towards the centre followed by the right. (See pic above). Repeat with the other two portions. Arrange the three "rolls" close together in a loaf pan/dish and let it rise yet again, about 30-40 mins. 


Preheat the oven to 180C. Once the rolls have risen to almost the rim of the tin/dish, bake for about 30 mins. 

I was really excited to taste the corn loaf. I kept peeping in as the loaf baked just because I couldn't wait for it to be ready. 

Once out of the oven, I had to let it cool before I could cut into it. This was pure torture. I wanted to know if I'd finally gotten it right. It smelt nice and corny. It looked nice and corny? Did it taste nice and corny too?


The verdict: Delicious! It was nice and corny. But, it wasn't exactly the loaf I ate as a child. Hrmmph. The corn kernels that dotted the loaf were a nice addition and they definitely added to the corn flavour of the bread. But they weren't infused into the dough. But, I was a step closer and perhaps next time I will use creamed corn instead and adjust the liquid in the recipe. 

Until then, this delicious loaf will have to do! It's not bad, really. My hubby loved it and he doesn't even really like eating corn. 

Sunday, February 3, 2013

Monkey Business


For the February Don't Call Me Chef column (which appears in The Star the first Monday each month, i.e tomorrow. Will post link up soonest), we (Jane, Ivy and I) decided to write about the one ingredient or dish that we love most. With Valentine's day around the corner and all, I decided to declare my undying love for the one ingredient I would not give up for anything (well, lets not jinx it. For almost anything): Butter.

I love butter. Don't give me margarine or shortening. It's butter all the way, baby. Butter on my toast. Butter in my omelette. Butter in pastry. Butter in my bread. Well, in this case, it's butter in and on my bread.

Monkey bread is a yeasted pull-apart bread that is soaked in butter. Oh Mamma! There is butter IN the dough. Then, once the dough is ready and shaped into tiny balls, it is dipped in MELTED BUTTER and then coated in a cinnamon-sugar mix. THEN, the leftover butter is drizzled on the balls of dough that have been staked in a baking pan before it goes in the oven.

What you end up with is a lumpy and marbled bread ring that just glistens with ... BUTTER.


I've always wondered where this bread derived its name. It sure doesn't look like a monkey. So I did a little digging (you tend to have some time on your hands when you bake bread; waiting patiently for the dough to rise). There are many theories as to the origins of the bread: that it was influenced by the crescent-shaped Parker house rolls that are baked side by side, that they were named after the Chilean Monkey Puzzle tree (I googled it and it takes some imagination to see the resemblance) or that it was named by silent film actress ZaSu Pitts and her neighbour Ann King who dubbed the neighbourhood children "meddling monkeys" for pinching the freshly baked breads the ladies used to make. King apparently went on to open a bakery some time in the 1940s which became known for this sort of bread.

The stories vary but the bread can definitely be traced back to as early as the 1940s. Apparently former US first lady Nancy Reagan amped up its popularity once again when she served a version of the bread at a Christmas tea some time in the 1980s.

No matter the history, this bread is delicious. Soft, sweet, buttery goodness. Perfect for breakfast and, if there is any leftover, for tea too.

The only issue I had was handling the dough which was pretty sticky. I tried kneading it with my hands right from the start, for I love the feel of dough as it is worked, but I had to leave off after a few minutes and let the dough hook of my mixer do the work for me in the initial stages. The dough was just a little too sticky. Not wet, but almost there. After about five minutes in the mixer, it became not just smoother but easier to handle, allowing me to switch back to using my hands. Nice!


Sticky, Gooey, Cinnamon Monkey Bread
Dough
30g butter, melted
1 cup warm milk (temp about 43 C)
1/3 cup warm water (also 43C)
1/4 cup castor sugar
1 tbsp (scant) instant yeast
31/4 cup all purpose flour
2 tsp salt

Cinnamon Sugar Coating
1 cup brown sugar
2 tsp cinnamon
1 vanilla bean, split and seeded (optional)

For Dipping
50g butter, melted

For the Glaze
1 cup icing sugar
3-4 tbsp milk

Equipment
1 Bundt pan (or, as I did, an Angel Cake pan)

Generously butter the baking pan with some softened butter (not in the recipe) and set aside.

Mix the milk, water, 30g melted butter and yeast together and set aside, allowing the yeast to be activated.

Mix the flour and salt in the bowl of your mixer. With the dough paddle attached, start the mixer on low (speed 2 on a Kenwood/Kitchen Aid) and gradually add the milk-water-butter mixture (the yeast should be bubbly and the mixture, frothy). Once the dough comes together, increase the speed a notch and knead until the dough becomes smooth, about 5-6 mins. 

Transfer the dough onto a lightly floured surface and knead with your hand until the dough gets smoother and more elastic and comes together in a ball. The dough will still be a little sticky but it can be handled pretty easily. 

Transfer the ball of dough into a lightly greased bowl (with oil or butter) and leave it, covered with a towel, for about an hour or until it doubles in size.


While the dough is rising, mix the cinnamon, sugar and vanilla beans together in a bowl. And, if you haven't already, melt the 50g butter for dipping.

Once the dough has risen, transfer it onto a very lightly floured surface and shape into a rectangle. Cut the dough into small squares, about 4cm X 4cm, or slightly smaller (I got about 30 squares).  Roll each square into a rough ball.

Dip the balls, one by one, into the butter first and then roll them in the cinnamon sugar and place them in the prepared pan, layering them as you go along. You should get about two or three layers of coated balls.

Drizzle the remaining butter over the balls; cover with a cloth and let the balls rise till it reaches the rim of the pan, about 40-50 mins.

Preheat the oven to 180C.

When the balls have puffed up, bake for about 30 mins or until the top layer is brown and caramelised and the sugar is bubbling around the seams and sides.

Remove, let the bread cool in the pan for about 15 mins before tipping the ring over on a plate/platter.


Prepare the glaze by mixing 1 cup icing sugar with 3-4 tbsp milk (depending how thick you want the glaze).

Once the bread has been tipped and has cooled, drizzle the glaze over the top, allowing it to drip down the sides. If you prefer a less sweet treat (but, why?), you can skip the glaze altogether. But again, WHY?


Monday, January 23, 2012

Cream Cheese-Filled Buns


About six months into sixth form (this was some 20 plus years ago), I realised I'd made a huge mistake signing up for the Accounting paper. It was hard and I wasn't very good at it.  Furthermore, it wasn't a subject that was taught in school and so we (me and some of my fellow classmates) had to go for private tuition after school — two hours, once a week. Despite the tuition, I still sucked at the subject. Mistake. Big mistake as my results later confirmed. 

What's the point of this story?

Well, one of the highlights of the weekly tuition classes was the visit to the small bakery that was located almost directly beneath the tuition centre. Well, it was about four doors down. Every week, before, after or sometimes during class, we'd run down to the bakery to buy ourselves some treats. My favourite? A cream cheese bun that was soft, sweet and deliciously nourishing. I'd buy two. On the days the bakery ran out of the buns (they were hot items apparently), I'd be miserable all throughout class. More miserable than usual, that is.

For some reason, I thought of those buns today.


I am not sure if that tiny bakery is still in business or not but even if it was, I was certain it would be shut today, it being the first day of the lunar New Year and all. Damn the timing of these cravings!

Well, I decided to try and recreate the buns at home since I had plenty of flour and some cream cheese. I couldn't find a recipe online that fit the buns that I remembered and so I made do. I used a recipe for sweet buns and made my own cream cheese filling to stuff the buns with, crossing my fingers all the while (not while I kneaded but otherwise). 


The buns turned out great. In fact, they tasted quite close to the buns I'd had all those years ago. The only fault was in my execution of re-sealing the buns once I filled them with the cheese. I was remiss in making sure the buns were 100% sealed and as a result, some of the filling oozed out while the buns were baking.

Eeeks. No matter. A slight oversight. We live and learn, right? The buns came out of the oven an hour ago and so far, I've gobbled down two already. That's it. I have to do about 1,000 jumping jacks once I'm done with this post. Onto the recipe now...


Cream Cheese-filled Buns

For the buns
1/4 cup tepid water
21/4 tsp instant yeast
2 tbsp + 1 tsp sugar
4 cups all purpose flour
11/4 tsp salt
30g butter, softened
11/4 cups milk + 2 tbsp
1 egg


For the Cream Cheese Filling
100g cream cheese, softened
50g icing sugar
1 tsp vanilla extract


Dissolve the yeast and 1 tsp sugar in the 1/4 cup tepid water. Set aside till mixture becomes frothy.

Using your mixer (or by hand) beat the butter, salt and 2 tbsp sugar till light and fluffy. Add the 11/4 cups milk, egg and the yeast mixture and mix to incorporate. Add the flour (switch mixer to low speed if using) and mix to form a dough. 

Transfer to a lightly floured work surface and knead for about five minutes or till the dough is smooth and elastic (you can do the window pane test by pinching a small amount of dough and stretching it to form a pane. If it stretches easily without breaking, you're done).

Transfer dough into an oiled bowl. Cover with a clean dish cloth and let it rise for about an hour.

Make the filling. Beat the cream cheese, sugar and vanilla till light and fluffy. Chill for at least 30 mins. 

Preheat the oven to 200C.

When the dough has risen, lightly punch it down with your fingers to release the gas. Weigh (or estimate) about 40g dough and form small balls of dough, slightly bigger than a golf ball. 

Once the balls have been formed (you should get about 14-16), flatten each one gently with your fingers and fill them with a heaped tsp of the chilled cheese filling. Seal the buns by pulling together the sides and pressing them shut and re-roll them into balls. 

Place them about 2 cm apart on a baking tray (with an edge) and leave them to rise for about 20 mins. Cover with the dish cloth again. 

Brush the tops with the 2 tbsp milk. 

Bake for 20-25 mins. 

Saturday, September 11, 2010

Twisted and loopy


I love soft, flavourful breads. All breads are flavourful, you may argue. Well, most home-made breads are indeed flavourful but I find that  store-bought breads are mostly pretty bland and have no character (I am talking about the loafs that are pre-packed and have a 2-week shelf life!).  Since I successfully baked my first loaf about seven months ago, I think I've eaten store-bought bread less than five times. Why buy when you can bake, right? Sure, baking takes time (unless you have a bread machine -- but where's the fun in that?). Also, baking my own bread means I can add any herb/nut/grain/seasoning I like depending on my mood.  Now that's really  swell especially since I love herb buns and they're not that easily available in stores.

So, anyway. I was in the mood for some bread making and was mentally going through a list of breads I could possibly make. What about Pretzels? I've never made them before even though I've read quite a few recipes and articles about making a good pretzel. Why not? I was feeling relaxed (a  four-day weekend would get anyone to relax, right) and adventurous. So, why not?

Usually whenever I get a craving for pretzels (not very often, thankfully) I head over  to Auntie Anne's Pretzels for a sour-cream and onion or cinnamon flavoured knot.  I like em. So the question is, could I make mine as nice?

I used a recipe I had earlier bookmarked from thefreshloaf.com, a great resource of you like making bread. I intended to make the  Laugenbrezel or the Lye Pretzel -- a basic pretzel that is first dipped in boiling water+ a drop of Lye and then baked. The recipe on thefreshloaf however skips the lye bath, deeming it unnecessary for homemade pretzels. Ok, great. Am all for skipping a lye bath for it kind of reminds me of a tic bath I have to administer on my dog, Mojo, from time to time. Urrgh.


As it turned out, my pretzels weren't as pretty as auntie anne's but they were really tasty. Especially the ones with grated cheese topping. Not bad (pat on back, pat on back) :)

Home made pretzels

(from thefreshloaf.com)

Makes 6 large pretzels
1 tsp instant yeast
1 tbsp brown sugar
2-3 cups bread flour
1 tsp salt
1 cup warm milk (approximately 110 degrees)

1 egg (for egg wash)

1 saucepan boiling water

Combine all the ingredients in the bowl of your electric mixer and mix until the dough forms a ball. Use 2 cups of  flour first and add more, if necessary. I used a little less than 21/2 cups. Mix it for about five mins on low speed (speed 2 on my Kenwood) and then anpther 5-7 mins on 4 until the dough is all smooth and shiny.

Remove the dough and form into a ball. Place in a greased bowl, cover with plastic wrap and let it rise till double the size, about an hour.

Degas the dough gently and then transfer onto a work surface.

Preheat your  oven to 220C.

Cut the dough into 6 pieces. Roll each one into a short log, cover with a towel and let the dough relax for 5 to 10 minutes. This makes it easier to  roll it out and stretch it.

Roll each log into long ropes about as thick as your index finger, 15cm in length. You may have to let it rest as you roll/shape them.

To shape the pretzel, form the dough into a"U". Cross the ends and cross them again. They fold the crossed ends downwards. Confused? Check out THIS site for guidance.

Once all 6 have been shaped, bring a saucepan of water to boil.

Now, using either two metal spatulas or a big wire strainer (the kind you use to deep fry stuff) dip each pretzel in the boiling water (one by one) for about 10 seconds. Drain and place on a baking sheet.

Brush each one with egg wash and sprinkle with salt and any topping of your choice: poppy seed, sesame seeds, nuts, onion powder, grated parmesan, etc.

Bake for about 15 mins or till nice and golden.

Eat it while its hot!

Wednesday, September 8, 2010

Miso like this!


Still on a Japanese food bend,  I tried to recreate a delicious dip I had in a Japanese fusion restaurant called Shokan in Tokyo. Served with a selection of raw vegetables, the dip was so good. The earthiness of the miso blended well with the freshness of the tomato paste; the saltiness of the miso went so well with the sweetish tomato paste. It was a marriage waiting to happen.

I tried to get the recipe for the dip from the owner /head chef of the restaurant -- a friendly guy who knew just enough English to converse with us -- but he subtly evaded my prodding again and again. The dip was his own concoction and I guess he wasn't going to pass it out  to just anyone.

No matter. I remembered the taste and I thought that I should be able to come up with something similar, if not identical. Half the fun is in the trying right? (WELL, not if you read my last post about Spekkoek!)


First, I had to determine the right ratio between the tomato paste and miso. 2:1 was what I settled upon. (You may have to set your own ratio depending  on the type of miso you use and how strong it is).

What else should I use?

The tomato and miso alone tasted yummy but there was still something missing. It wasn't the same as the one I had at Shokan. I tried adding a few different ingredients: minced ginger (not bad), pepper (not great), vinegar (just a bit is actually quite nice), japanese mayonnaise (oh, so yum: with less tomato paste).

Ok, so I may not have cracked the code and replicated the dip at Shokan exactly but who cares? I still have a very tasty miso sip ... actually I have several and that's good enough for me.

Monday, April 12, 2010

Red hot emergency


What a beaute, eh? Here's the story of how this gorgeous machine ended up in my kitchen.

Last Firday, my trustee RM100 Kenwood mixer whirred it's last breath. This is not a reflection on Kenwood but rather on how I've abused the machine. You see, I've been making bread like nobody's business (for Crazy Juliet) and the poor basic mixer could not cope with the work load. I was midway through making my pita dough when the poor thang started groaning and moaning and finally, it just refused to work ... just like any overworked employee. I was sad at first but panic soon took over. After all, I had to make 7 pieces of pita bread and two wholemeal loaves by Sunday or I would be in serious trouble.

This classified as an emergency, for sure! I had no choice but to knead the flour by hand (unlike my business partner/colleague Marty I do not find this therapeutic) and at the end of it exhaustion pushed panic aside. It was a night when emotions ran high.

Tomorrow, I vowed, I will get myself a proper, hardier machine that could stand some heavy duty baking.

And that's how I welcomed this red beauty -- the Kenwood Patissier 4L, 400 W mixer. I got it in signal red of course and have used it to make a second batch of pita, and the two wholemeal loaves. I love it. Love, love, love it.  Now I just hope my poor battered basic mixer can be saved.

Now onto the pitas and the wholemeal loafs. The key to making a perfect pita is in getting the circular bread to puff up slightly, leaving an envelope in the centre in which you can stuff with a variety of fillings. The thing to remember is not to roll the circles too thick. Roll them 7 inches in diameter but just  allow 1/4 inch thickness.  I used 2 cups high protein flour and 1 cup whole wheat and added some sage for extra flavour : an adaptation of a basic pita recipe found on The Fresh Loaf.


The wholemeal loafs are adapted from the basic Pullman Loaf, a perfect sandwich bread. The Pattisierre was a joy to use: so silent and so efficient.

For the Pullman, you need 4 cups flour (I used 50% whole wheat and 50% high protein), 1/4 cup dry milk, 2 tsp salt, 1 tbsp instant dry yeast, 6 tbsp softened butter, 2 tbsp honey/maple syrup, 11/4 cups tepid water. Whisk the flour, milk and yeast together. Transfer to the bowl of your mixer, attach the dough hook to the mixer, add the butter to the dry flour combo and start kneading (speed 2 or low) till butter is well combined. Add the water, salt and honey and when the flour is moist, speed up the mixer to 4 (medium).  Knead for 7 mins or till a smooth but sticky dough forms. Transfer dough to a floured surface, form into a ball, flour the top and cover with cling film for 15 mins. Once rested, deflate with your finger tips and shape the dough into a rectangle (10 x 8 inches). Given the rectangle an envelope turn (90degrees) and form a 12 inch roll and then shape it once more into a loaf to fit your pullman tin. Cover and et it rise till just an inch below the rim. Bake, covered, for 3o mins and then uncovered for 15-30 mins or till brown.


Now that the bread is all done and my house is smelling like a bakery, it's time to make myspreads: hummus, oilve tapenade and sun dried tomato pesto. There is no rest for the wicked ... but I ain't complaining. No better way to spend a rainy Sunday.

Monday, November 9, 2009

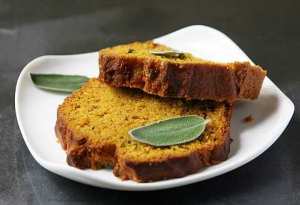
Pumpkin + sage + butter = yummy

[caption id="attachment_193" align="aligncenter" width="300" caption="The delicious pumpkin bread-cake. It's moist and not too sweet. And it smells divine"]pumpkin[/caption]

This marks another first for me. Have always shied away from making breads because it sounded like a lot of work -- kneading and kneading and more kneading? Urmmm, no thanks.

Plus, I have an inexplicable fear of cooking with yeast.

Then I came upon this fantastic recipe for pumpkin bread from Martha Stewart (yes, I do love her) in her magazine. It doesn't require kneading or yeast and just reading through the list of ingredients made me salivate.

And it sounded pretty easy to make.

Usually, Martha's recipes just need to be followed to a T. With this bread though, instead of dividing the mixture into 8 small loaf pans, I put it all in one big loaf pan and as a result I had to bake it for 20 mins longer than the 30 mins she prescribed. I also had no ground clove ( you need 1/8 tsp) so i omitted that. Otherwise, it was fantastic.

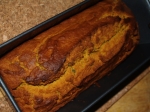
[caption id="attachment_192" align="aligncenter" width="150" caption="Straight outta the oven. "]pumpkin loaf[/caption]

(Almost) Martha's Pumpkin, Sage and Brown-Butter Quick Bread


6 ounces (about 170gms) unsalted butter plus a little more to butter the pan


1 cup fresh sage, thinly sliced


1 and 2/3 all purpose flour plus a little for dusting pan


2 tsp baking powder


1/2 tsp ground cinnamon


1/4 tsp freshly grated nutmeg (I used powder as I did not have fresh nutmeg)


1 tsp salt


1 cup solid packed pumpkin (from can)


1 cup brown sugar


2 large eggs


Heat oven at 180. Grease loaf pan with butter and dust it with flour.


Melt butter over med-low fire. Add sage strips and cook till butter turns golden brown -- should take about 5-8 mind. Let cool.


Sift flour, baking powder, cinnamon and nutmeg and whisk together with salt.


In a separate bowl, whisk pumpkin, eggs, sugar and the browned butter with sage. Once smooth and well mixed, add flour mix gradually till all incorporated.


Transfer to loaf pan. Smoothen top and bake for about 55 mins or till knife comes out smooth.


Let cool. Garnish with some  fresh sage leaves.

Related Posts with Thumbnails