Showing posts with label butter. Show all posts

Tuesday, August 13, 2013

Heston Blumenthal's Scramble With Brown Butter


When I watch cooking shows on TV, I am often inspired to try the dish the chef/cook on TV is making. In most cases, I'd have to go shop for the ingredients first and so the dish never gets done. Or maybe it does ... months later. But when I saw British chef Heston Blumenthal demonstrate his method of cooking scrambled eggs on MasterChef Australia (Season 5, episode 49), I got up right after the episode and tried his recipe out - all I needed was eggs, milk, cream and butter, all staples in my pantry.

Heston doesn't scramble his eggs in a pan. What he does is combine all the ingredients (eggs, milk, cream and butter) in a heat resistant bowl and place it over a saucepan of boiling water. He then stirs and stirs and stirs the mixture until the butter melts into the egg and milk and cream (and salt and pepper) and the eggs start to curdle. 

To get the creamiest eggs, Heston says you have to cook the eggs very gently - not directly over the heat but  over a water bath/bain marie. Well, he's right, of course.


What you end up with is a deliciously creamy bowl of eggs that are as smooth as satin. Well, kinda. But boy, are they creamy and nice.

But that's not all. He tops the eggs with some brown butter or beurre noisette (literally translated to mean hazelnut butter). OH MY GOD. Is this the food of kings or what! (He also adds a few drops of sherry vinegar which I didn't have and so didn't use).

Eaten with toast and maybe with a sprinkling of chopped parsley and this is a breakfast to get you going!


Heston's Scrambled Eggs

3 large eggs
15g butter
15g milk
15g cream
salt and pepper

Put all ingredients in a heat resistant bowl. Boil a saucepan of water. When the water has started boiling, place the bowl on top of the pan (make sure the water doesn't touch the base of the bowl). With a spatula, gently stir the mixture until it starts to curdle. Take it off the heat and plate.

Brown Butter
Heat some unsalted butter in a pan over low heat. Swirl the butter around until it melts and then starts to brown and smell nutty. Take it off the heat and strain through a coffee strainer. Spoon over the eggs.

Sunday, February 24, 2013

Deep Fried Butter


Paula Deen is one of my guilty pleasures.

There! I've said it. I guiltily tune in to her show on TV to watch as she creates Southern-style dish or other that almost always has butter or cream or both. And don't get me started on all that deep frying and all that sugar!

Some classic Paula meals? A brunch burger that comprises a hamburger patty, sliced bacon and a fried egg in between two halves of a GLAZED DOUGHNUT! And there's the deep-fried cheesy lasagna. Oh! Wait... there's more: A cheesecake WITH white chocolate that's wrapped in a pastry that is coated with egg and DEEP FRIED! The fried cake is then dusted with powdered sugar! Holy smokes. I may need to catch my breath after that one.

As flabbergasted as I sometimes am at her artery-clogging, full fat recipes, they do sound really appetising. Well, maybe not the cheesecake ... that just sounds scary. But often, I find myself wanting to reach through my TV screen to just grab a taste of what she's served up. Her lemon linguini with butter, sour cream and cheese, for example, just sounds too good. As does her three-cheese artichoke dip.

There was one recipe in particular that I've wanted to try for a very long time. I actually first saw it on a programme on the food channel about the food that come out of state food fairs in the United States. Of all the deep-fried concoctions, one stood out: deep fried butter. A stick of frozen butter was impaled on a stick, coated with batter and deep fried.

What? My head was spinning at the idea of deep fried butter.

Then I saw it on Paula's show. Her way is slightly different. She mixes softened butter with some cream cheese, freezes the mix and then deep fries it.

I had to make it. I was curious. I just had to try it.

Of course it tastes great. Of course I was tortured with guilt at every bite but it was just so good. (I rationalised that if I only ate two pieces, it's about the same as eating a piece of toast with lots of butter! He he he.)

So here it is. A sometimes snack which I vow to make sparingly. Just so good!


Deep Fried Butter Balls
125 gm butter, softened
50g cream cheese, softened
1 tbsp chopped parsley
1 tsp chilli flakes
For coating
1 egg, lightly beaten
1 cup flour
2 cups bread crumbs

Mix the softened butter, cheese and parsley together till well incorporated. Spoon the mixture into balls and freeze for at least 30 mins or until hard.

Coat the frozen butter balls: roll them first in flour, then egg, then bread crumbs. Work swiftly so the butter doesn't get too soft. Repeat.


Freeze the coated balls again for at least 30 mins or until hard.

Heat some oil in a pan (enough to submerge the balls). When the oil is hot (about 180C), drop the balls in and fry till golden, about 15-20 seconds. Remove onto paper towels and serve. Some butter may leak out but if the balls are well coated, this should be minimal.

Enjoy! 

Sunday, February 3, 2013

Monkey Business


For the February Don't Call Me Chef column (which appears in The Star the first Monday each month, i.e tomorrow. Will post link up soonest), we (Jane, Ivy and I) decided to write about the one ingredient or dish that we love most. With Valentine's day around the corner and all, I decided to declare my undying love for the one ingredient I would not give up for anything (well, lets not jinx it. For almost anything): Butter.

I love butter. Don't give me margarine or shortening. It's butter all the way, baby. Butter on my toast. Butter in my omelette. Butter in pastry. Butter in my bread. Well, in this case, it's butter in and on my bread.

Monkey bread is a yeasted pull-apart bread that is soaked in butter. Oh Mamma! There is butter IN the dough. Then, once the dough is ready and shaped into tiny balls, it is dipped in MELTED BUTTER and then coated in a cinnamon-sugar mix. THEN, the leftover butter is drizzled on the balls of dough that have been staked in a baking pan before it goes in the oven.

What you end up with is a lumpy and marbled bread ring that just glistens with ... BUTTER.


I've always wondered where this bread derived its name. It sure doesn't look like a monkey. So I did a little digging (you tend to have some time on your hands when you bake bread; waiting patiently for the dough to rise). There are many theories as to the origins of the bread: that it was influenced by the crescent-shaped Parker house rolls that are baked side by side, that they were named after the Chilean Monkey Puzzle tree (I googled it and it takes some imagination to see the resemblance) or that it was named by silent film actress ZaSu Pitts and her neighbour Ann King who dubbed the neighbourhood children "meddling monkeys" for pinching the freshly baked breads the ladies used to make. King apparently went on to open a bakery some time in the 1940s which became known for this sort of bread.

The stories vary but the bread can definitely be traced back to as early as the 1940s. Apparently former US first lady Nancy Reagan amped up its popularity once again when she served a version of the bread at a Christmas tea some time in the 1980s.

No matter the history, this bread is delicious. Soft, sweet, buttery goodness. Perfect for breakfast and, if there is any leftover, for tea too.

The only issue I had was handling the dough which was pretty sticky. I tried kneading it with my hands right from the start, for I love the feel of dough as it is worked, but I had to leave off after a few minutes and let the dough hook of my mixer do the work for me in the initial stages. The dough was just a little too sticky. Not wet, but almost there. After about five minutes in the mixer, it became not just smoother but easier to handle, allowing me to switch back to using my hands. Nice!


Sticky, Gooey, Cinnamon Monkey Bread
Dough
30g butter, melted
1 cup warm milk (temp about 43 C)
1/3 cup warm water (also 43C)
1/4 cup castor sugar
1 tbsp (scant) instant yeast
31/4 cup all purpose flour
2 tsp salt

Cinnamon Sugar Coating
1 cup brown sugar
2 tsp cinnamon
1 vanilla bean, split and seeded (optional)

For Dipping
50g butter, melted

For the Glaze
1 cup icing sugar
3-4 tbsp milk

Equipment
1 Bundt pan (or, as I did, an Angel Cake pan)

Generously butter the baking pan with some softened butter (not in the recipe) and set aside.

Mix the milk, water, 30g melted butter and yeast together and set aside, allowing the yeast to be activated.

Mix the flour and salt in the bowl of your mixer. With the dough paddle attached, start the mixer on low (speed 2 on a Kenwood/Kitchen Aid) and gradually add the milk-water-butter mixture (the yeast should be bubbly and the mixture, frothy). Once the dough comes together, increase the speed a notch and knead until the dough becomes smooth, about 5-6 mins. 

Transfer the dough onto a lightly floured surface and knead with your hand until the dough gets smoother and more elastic and comes together in a ball. The dough will still be a little sticky but it can be handled pretty easily. 

Transfer the ball of dough into a lightly greased bowl (with oil or butter) and leave it, covered with a towel, for about an hour or until it doubles in size.


While the dough is rising, mix the cinnamon, sugar and vanilla beans together in a bowl. And, if you haven't already, melt the 50g butter for dipping.

Once the dough has risen, transfer it onto a very lightly floured surface and shape into a rectangle. Cut the dough into small squares, about 4cm X 4cm, or slightly smaller (I got about 30 squares).  Roll each square into a rough ball.

Dip the balls, one by one, into the butter first and then roll them in the cinnamon sugar and place them in the prepared pan, layering them as you go along. You should get about two or three layers of coated balls.

Drizzle the remaining butter over the balls; cover with a cloth and let the balls rise till it reaches the rim of the pan, about 40-50 mins.

Preheat the oven to 180C.

When the balls have puffed up, bake for about 30 mins or until the top layer is brown and caramelised and the sugar is bubbling around the seams and sides.

Remove, let the bread cool in the pan for about 15 mins before tipping the ring over on a plate/platter.


Prepare the glaze by mixing 1 cup icing sugar with 3-4 tbsp milk (depending how thick you want the glaze).

Once the bread has been tipped and has cooled, drizzle the glaze over the top, allowing it to drip down the sides. If you prefer a less sweet treat (but, why?), you can skip the glaze altogether. But again, WHY?


Sunday, January 13, 2013

Creamed Brussels Sprouts


I grew up hating Brussels sprouts. I'd never seen them, mind you, let alone tasted them but I hated them with a passion simply because I'd heard some TV character on a show I can't really remember describing how horrible it was. And the name: Brussels sprouts? How appetizing is that? The closest personal contact with the vegetable came when my brother flew to England via Russian airlines, Aeroflot (which was at the time the cheapest way to fly to Europe) and said he'd tasted Brussels sprouts on the plane. He didn't like it one bit. That only strengthened my case against the miniature  cabbage.

I think I must have been 37 years old when I first set my eyes on Brussels sprouts in the imported section of the supermarket. I thought they looked kinda cute but I had no intention of buying them or trying to cook them. After all, the people on TV say that they're bad. Oh, and my brother too. It didn't occur to me that on an airplane, even the can't-go-wrong potato tastes nasty. Most times. 

And then, a couple of years ago, as I started visiting and reading more and more food sites, I began to see a completely different picture being painted about the vegetable. Here were food writers, cooks and chefs who actually loved Brussels sprouts and extolled the virtues of the vegetable. British chef/writer Hugh Fearnley-Wittingstall for one describes Brussels sprouts as "sweetly, toothsomely tender and delicious." Really? 

My curiosity was piqued.

Well, since my cooking resolution this year is to actually cook all the recipes/ingredients I'd bookmarked but never actually got around to, I thought I'd finally give the sprouts a go. 

I decided to take Hugh (first name basis, already?) to task and try his recipe for Creamed Brussels Sprouts. I had to adapt it a little as he uses bacon: sooo not an option for a vegetarian. Hugh also uses chestnuts which I didn't have at hand. Bummer.  So much for following his recipe. Oh well, if the sprouts were really that wonderful, they should be able to stand out despite a few ingredient modifications, I thought. 

I replaced the bacon with some porcini mushrooms (portobello would work fine too, given it's robust flavour) and the chestnuts, I substituted with roasted hazelnuts. 

Creamed Brussels Sprouts with Mushrooms and Hazelnuts
(Adapted from Hugh Fearnley-Wittingstall's Creamed Brussels Sprouts with Bacon)

8-10 Brussels sprouts
30g butter
2 tbsp heavy cream
2 cloves garlic, chopped fine
1/2 cup dry porcini mushrooms, re-hydrated and chopped fine
10/12 roasted hazelnuts, roughly chopped
a handful of chilli flakes
salt and pepper


1. Slice off the rough part of the stems and discard the outer leaves if they are damaged. 


2. Cut an 'X' into the core/stem of the sprouts. This will make sure the sprouts cook all through. 

3. Heat a pot of salted water. When the water has come to a rolling boil, toss in the Brussels sprouts and cook for about 6-8 minutes. 


4, Drain the sprouts and cut them in half, length wise and put them in a bowl.


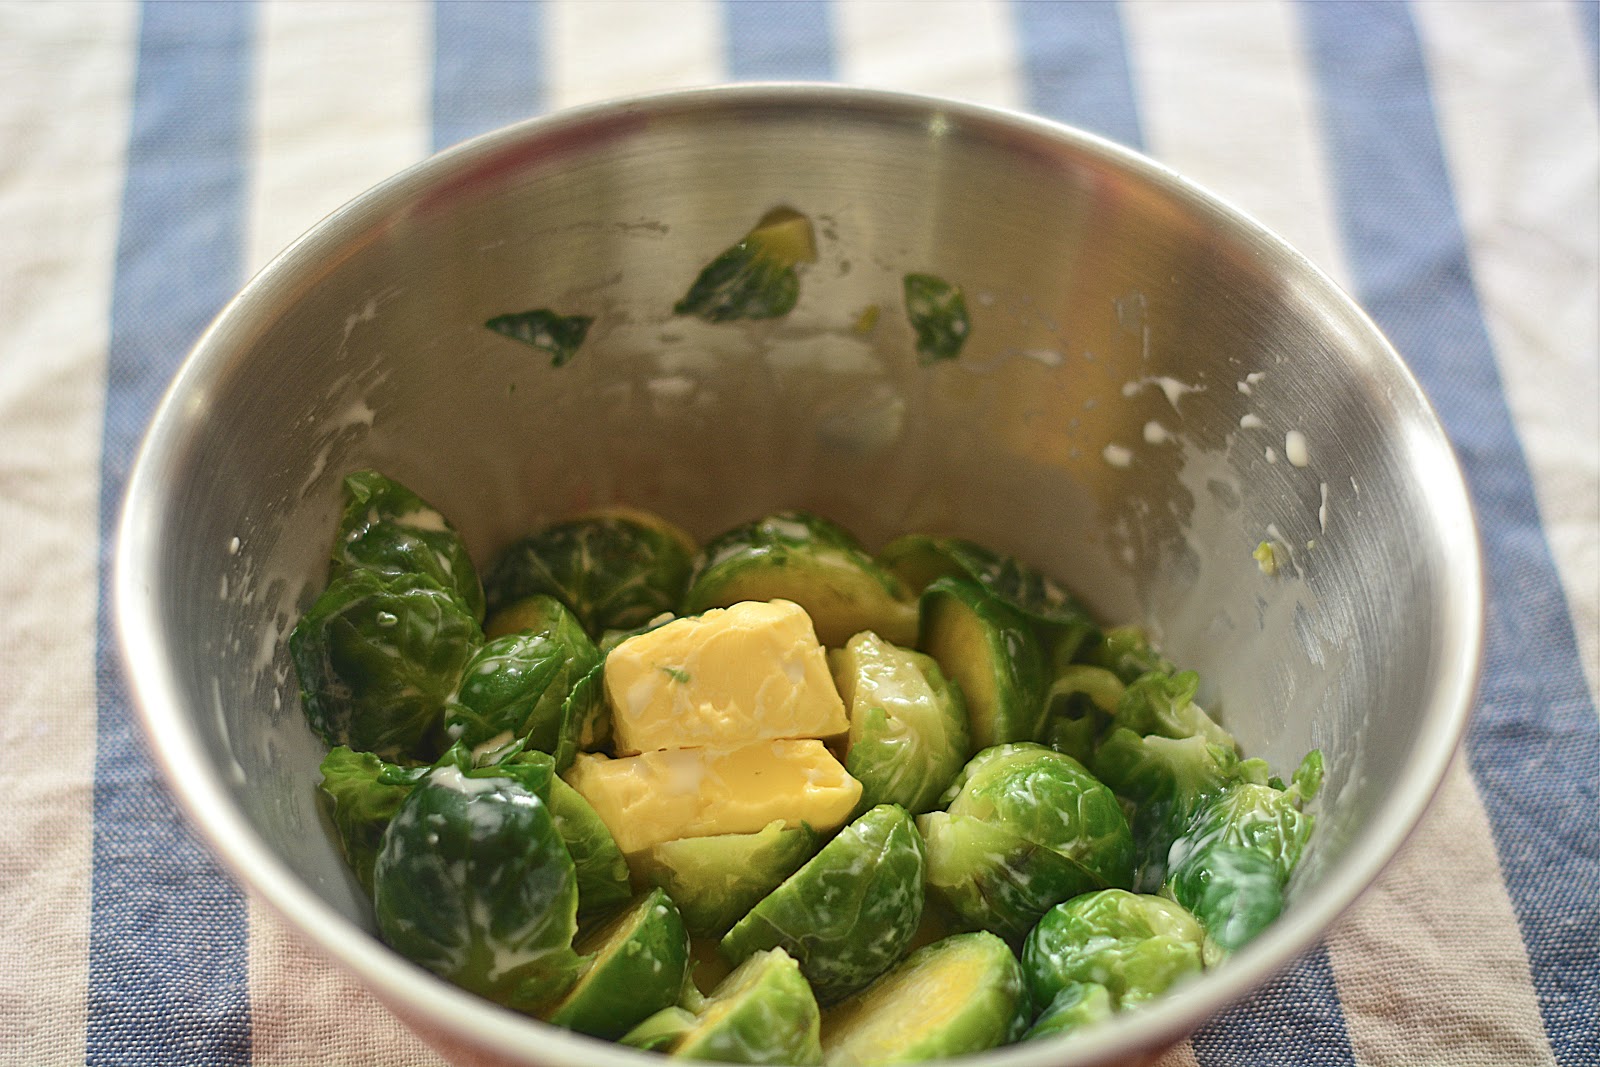
5. While still hot, add the butter and cream and toss the sprouts to coat them in the fat.


6. Transfer the sprouts, butter and cream into a blender and pulse until you get a rough, creamy puree. 

7. Heat a skillet with butter (about 20g) and add the garlic and chilli flakes. Cook until fragrant and then add the mushrooms. Cook for about five minutes. Add the pureed sprouts and mix it into the buttery mushroom mixture till incorporated, about 5 mins. Season and remove from heat.


8. Garnish with chopped nuts.

Even without the bacon and chestnuts, this dish is a keeper. The creamed sprouts are great as a dip or to be spread on bread. I must admit I ate quite a few spoonfuls off the bowl without any bread or crackers. Delicious indeed.


My guess is that if this dish (or Hugh's original recipe for non-vegetarians who actually do have bacon and chestnuts on hand) is your introduction to Brussels sprouts, you're going to want more. I know I do! Next on my list? Hash sprouts with capers and lemon juice. Try this!

Sunday, July 8, 2012

Punitions


Punition, in French, translates to punishment. The stort behind these sables are just too cute (and bewildering). Apparently, French baker Pierre Poliane's grandmother used to play a game with her grandchildren: they'd be out playing and she'd call them back, apparently to punish them for something or other and instead, she'd hand them a tray (or plate — the specifics are hazy) of these sables. Hence, they became known as punitions. Lucky fella, that Poliane! When we were kids, each time we'd get called in for a punishment, we'd get one. And without any cookies. 

Believe me, there are nothing punishing about these buttery cookies. They're simple, humble cookies but therein lies the beauty: crisp, light, only mildly sweet and wonderfully buttery.  


They're also really easy to put together. The cookies don't need any adornment (though they are sometimes used to sandwich a chocolate or cream filling) but I decided to play a little and try my hand at decorating them with some royal icing. 

Royal icing is quite simple to make: you can either use meringue powder or egg whites which you whisk together with icing sugar and water/lemon juice/vanilla. Then you colour the icing as you wish and pipe/spread the icing on the cookies as you wish.

I'd decided to make the icing on a whim. So I started whipping the egg whites (I didn't have meringue powder) before realising that I had barely any icing sugar left. (You need about 2 cups sugar per egg white to ice about a dozen cookies). Arrrgh. I had to make do but the result was a slightly thin icing which made piping it a nightmare. The damn thing kept running everywhere. 

Also, I am not comfortable with eating or serving raw egg whites and so I popped the iced cookies in the oven (low heat: about 150C) for about 10 mins for the icing to cook and become a kind of meringue. It was good, I must say!


Punitions


145g butter, unsalted
1/2 cup (heaped) castor sugar
1 egg
2 cups flour
1/4 cup (scant) corn flour


Beat the butter with the paddle attachment of your mixer until smooth. Add the sugar and beat till incorporated. Don't beat it too much that it gets fluffy as you would when baking cakes. Add the egg and mix until the mixture becomes smooth and satiny. Add the flour and corn starch mix just until the dough comes together. 


Divide the dough into two, shape into discs, wrap in clingfilm and chill for an hour or so. 


Preheat the oven to 180C.


Roll dough out to about 5mm thickness and cut it with your cookie cutter. Place on a line baking sheet (about 2cm apart) and bake for 8 mins or until the middle of the cookie is set but the punitions are still beautifully pale. The edges may turn golden a little if your cookies are a little on the thin side.


Cool and serve.

Monday, October 31, 2011

Shortbread Mania


I don’t normally dream of food. I think about food a lot sometimes (presently I have tempeh on my mind, almost constantly) and I often have cravings (mostly for calorific food like cheese pretzels or corn nuts); but I dare say I have never dreamt of food. But last week, I dreamt of shortbread. How random is that? Shortbread! 

So this was it: I was at a garden party (actually I was the only one at the party), sitting at a table wearing a kilt. I was looking intently at a plate of pale, sugary shortbread that was placed in front of me. There was a huge tea pot beside the plate, but no cups (how rude!). I could hear a a horse somewhere in the background but there wasn’t any sign of a prince (again, how rude!).Quite bizarre and a little boring, given that nothing actually happened in the dream. No story. No plot. No drama. I woke up wondering (of all things) why I chose a grey kilt and not a red one! I am weird ... for choosing grey... I know.

I don’t interpret dreams but I’d say I have taken “craving” to a whole new level. My subconscious was craving shortbread ... and I was more than willing to comply.

I’ve made shortbread several times before so I could have easily dug out an old recipe but instead, I chose instead to trawl the net for something different. BIG MISTAKE. Well, not mistake exactly, but what should have been a quick and easy baking job became a week-long project.

Turns out there are more ways than one to make the classic shortbread and I was game to try a few recipes in search of my favourite.

There are three essential ingredients in all shortbreads —  flour, butter and sugar (the ration between the three is usually 4-2-1) and the process of making shortbread is really quite straight-forward:
   Step1: Cream the butter and sugar. Most recipes call for softened butter but some use melted butter.
   Step 2:  Fold in the flour, being careful not to over mix the dough (unless you like tough cookies!)
   Step 3: Bake.
That’s the standard recipe I’ve tried and my biscuits always turn out well: buttery, soft and crumbly. But in my search for something different, I stumbled on a recipe for a vegan shortbread that uses absolutely no butter.

No butter?
I put aside my skepticism — can you even call it shortbread without the butter? — and decided to give it a go.

Experiment One  : Vegan Shortbread

 No butter? No worries!
Instead of butter, the vegan shortbread uses canola oil. AND, apart from the sugar and the flour, the recipe also calls for baking powder and rice flour (which many cooks say enhances the texture of shortbread). 
The recipe: 
2/3 cup Oil
1/2 cup icing sugar
11/2 cups + 1 tbsp all purpose flour
1/4 cup + 1/4 tsp rice flour (I used tapioca flour instead)
1/4 tsp baking powder
pinch of salt
2 tsp vanilla
granulated sugar for sprinkling (optional)

Preheat the oven to 160C. Line an 2ocm round pan with parchment paper. Mix all dry ingredients together. Make a well in the center and pour in the oil and mix with a wooden spoon. Add the vanilla and mix it in evenly. Transfer the dough (slightly sticky) onto the lined pan and press evenly with the back of the spoon or your hand. Poke holes with a fork and lightly score it into 8 wedges.Sprinkle with raw sugar and bake for 35-40 mins. Let it cool before cutting.
The result: It was pretty good actually. Way above my expectations. Soft, crumbly and very tasty. The only flaw: I kinda missed the butter. I like my shortbread really buttery and even though the vegan version was nice, I wanted a buttery biscuit.

The verdict: the vegan shortbread is a wonderful alternative for people who don’t eat butter. But since I do, I’ll  stick to my standard recipe.

Experiment 2: Melted butter and twice the heat.
Are you (pine) nuts about shortbread ?
The second recipe uses butter. But it uses melted butter. And, it takes a while to make because once you mix the ingredients together (pretty much the same way you mix it in the vegan recipe), and after you've pressed it into the tray, you have to let it rest (and you thought bread was difficult) for two hours MINIMUM) before you  bake it. And, after baking it for 30-odd mins, you have to take it out, let it rest AGAIN and then pop it back in the oven for 10 mins. 
I wasn't sure what the "resting" was for so I baked a batch without resting it at all and another batch with the required 2-hour rest. Turns out, resting made the shortbread more tender. Still crunchy (thanks to the double baking) but nice and tender inside. Still crumbly, like a good shortbread should be. The double baking seems like an awful lot of work but if you like a nice crunch on the outside of your shortbread, you'll be willing to go the extra mile. 

 Twice-baked Shortbread 
(from SmittenKitchen; adapted from Alice Medrich's Pure Dessert


170g unsalted butter, melted and still warm
5 tbsp granulated sugar
1 tsp vanilla extract
1/4 tsp salt
1 1/2 cups all-purpose flour
Granulated sugar for sprinkling

Mix the sugar into the warm, melted butter and stir till combined. Add the vanilla and then fold in the flour (mix the salt in first), bit by bit.

Line your baking tray with foil (let the foil hang down the sides). Press the dough into the baking tray/pan. Flatten and let it rest for at least two hours.

Bake in a pre-heated oven (150C) for 30-40 mins (place it in the lower rack of your oven).
Remove and let it cool for about 10 mins. Remove the shortbread (lift the foil by the flaps) and gently cut it with a sharp knife into squares. Place the squares on a lined baking sheet and bake for another 10 - 15 mins.


Monday, August 1, 2011

Cheesy Scallion Scones


When you think of scones, it's only natural, I guess, to think of clotted cream and jam. Thick, sweet, strawberry jam. Drool, right?

But wait. These flavoured savoury scones are pretty good without the cream or jam. These scones  — full of cheese (two types) and finely chopped scallions — are best eaten with just butter, fresh out of the oven of course.

Oh so good is what they are.


As you may have guessed, scones are my latest obsession. Since I made the strawberry and cream cheese scones a couple of weeks back, I have been having quite a bit of fun playing with different flavour combinations for scones, some savoury, some sweet. Raisins, mixed herbs, lemon and cheese, orange (and rum) and pineapple (and rum) were among the flavours I played with. While they were all tasty (the rum-flavoured scones are a work-in-progress and will be featured separately once perfected), these cheese and scallion scones were my absolute favourite.

Now scones don't take long to make. They may be in the bread family but they're quick breads which basically mean they don't use yeast. As a result, you don't need to wait for the dough to rise before you shape or bake them.

And, because the secret to a soft and light scone is not to overwork the dough, you don't need to knead the dough. Less is more when it comes to handling the dough.


I used cheddar + cream cheese for these scones but I am going to try some other cheese combinations: feta would be good, I am sure, with the cream cheese. As would Swiss white cheese. Parmesan, yup. Gruyere, am sure would work too.  The scallions can be replaced with chives or dill.

Cheesy Scallion Scones
1.5 cups all purpose flour
1.5 cups whole wheat flour
1 tbsp + 2 tsp baking powder
1 tsp salt
1/2 cup cheddar cheese, grated
1/2 cup cream cheese, softened
1/3 −1/2  cup chopped scallions
1 egg
1 cup milk

Preheat oven to 200C.

Whisk the flours, salt and baking powder together. Add the cheeses and gently stir with a fork so they are incorporated into the flour. Add the milk and eggs and again, gently stir with a fork till the mixture forms a soft dough. Add a couple of tbsp more flour if necessary (but bear in mind the flour must be soft and slightly sticky.

Transfer to a floured surface and shape into a circle, about 2 cm thick.

Don't overwork the flour.

Cut the circle into 8-10 segments/wedges.

Transfer onto a lined baking sheet and let it rest for 10 mins.

Bake in the preheated oven for 15-20 mins or until the scones begin to get golden.

Remove and cool on a rack. Eat warm with butter.


Tuesday, June 21, 2011

Plain and simple


Folks, this is a lesson on how you should never say never. 

It wasn't too long ago that I declared my dislike for baking cookies. Too time consuming, I said it was. Tedious, even. Besides, I didn't have the patience or the knack for making cookies. 

Well, guess what? I'm now hooked on baking biscuits. What happened? Well, it started with a batch of chocolate chip cookies I baked some time back. They were an experiment: a challenge I posed to myself after watching an episode of Throwdown With Bobby Flay on the Food Network. The cookies turned out great. Everyone I offered it to love it. In fact, my nephew asked for more. My sister-in -law even. My husband too. 

I was on cloud nine. Suddenly, baking cookies didn't seem tedious anymore. Instead, it was strangely satisfying. 

I'm easy, aren't I? (you can't see me but I am cowering in shame).


Encouraged by the success of the choc chip cookies, I recently tried making a batch of Toasted Almond Sables. The French butter cookies turned out great too. Oh my. Maybe I was wrong. Maybe it wasn't so difficult. 

I was inspired. More. I want to make more cookies. I settled on making Rachel Allen's basic cookie recipe next. I love watching Rachel Allen's Bake on the food channel. Her cookies always look so yummy and not at all daunting. 

While the basic cookie tastes good in itself (soft, not too sweet or crumbly), it's actually a blank canvas that can be the basis for a variety of flavour combinations: you can add nuts, lemon zest, orange zest, candied peel, dried fruit, spices ... anything you wish, to add flavour and texture to the cookie. 

I decided to jazz my cookie up with lemon zest.  Lemon in any dessert is a winner in my book. 

The cookies turned out well. They were light, buttery but not too much. The lemon added a sparkle to the cookie. A tangy pop. Next time, I'm going to try adding some nuts. 

Yes, next time. I'm hooked!


Basic Cookie (with lemon zest)

225g unsalted butter, softened
110g Castor sugar
275g all purpose flour
2 tbsp lemon zest

Preheat the oven to 170C.

Cream the butter in the mixer until, well, creamy. Add the sugar and mix till light and fluffy. Gradually add the flour and zest till a dough forms. Be gentle. The gentler you are, the more tender your cookie. 


Spoon walnut sized portions of the dough on a lined baking tray and flatted the balls with the back of a spoon. To avoid the dough sticking to the spoon as you do this, coat it lightly with flour. 

Bake for about 13-15 minutes. The cookies will be soft when you take the out but fret not, they will harden as they cool. 


Sprinkle some snow sugar/icing sugar over the cookies. Don't worry, they won't be too sweet. 

To eat? These babies are best dunked in a hot cup of tea. Or coffee, I suppose. I wouldn't no, cos I never drink coffee.

Oh there I go again: never say never I say!


Monday, February 21, 2011

Puff the magic pastry

This puff doesn't look at all professional so you KNOW its homemade, right? Absolutely. But, though obviously imperfect, I don't think I've been so happy with anything I've baked as I am with this puff. It's a simple eggplant puff : roasted eggplant + greek yoghurt + lemon juice, chevril and pine nuts with white cheese.

But the filling is not what I'm over the moon about. It's the pastry. I made the puff pastry at home, from scratch. Making my own puff pastry has been on my to-do list for about six months. I've put it off so long simply because it looked to troublesome and difficult. Most books/recipes on puff pastry come with diagrams, for goodness sake! Diagrams? Egad. Diagrams just remind me of secondary school Science lessons. Not a very pleasant memory. So, yeah. 

But for some reason I felt brave enough to give it a go last Thursday. It was Chap Goh Meh (the 15th day .. and the very last day of the Chinese New Year) and there were some awesome firework displays going on outside. It was 9pm, my usual baking hour. My dog, Mojo, was terrified and refused to go outside. He kept close to me ... real close... his wet nose was, quite literally, stuck to my ankle.  The cutie.

So together, we marched into the kitchen for my most ambitious project this year.

Making puff pastry takes time. Why? Well, you get the rich, flaky and buttery goodness of puff pastry by patiently creating layers (and layers) of dough and butter.

Start by making your basic dough.
250 gms high protein or bread flour
pinch of salt
250 gms unsalted butter
3 tbsp water (more if necessary)

Sift the flour and the salt into a bowl. Cut up 50gms of the cold butter into cubes and with your fingers, gently rub it into the flour till it resembles fine breadcrumbs. Add the water (one tbsp at a time) and, using a knife (and later your fingers), bring the mixture together to form a dough. No need to knead. The dough should be a little sticky.  

Turn the dough out onto a lightly floured surface and rounding it into a ball.Make an X-shaped incision on top of the dough and then wrap tightly in plastic and chill for at least 40 mins. 
While waiting, work the butter.
Sandwich the remaining 200 g butter (still cold but not frozen, about 10-15 mins out of the chiller) in-between two sheets of greaseproof paper. Gently tap with a rolling pin until softened to the same consistency as the dough. Form the butter into a rectangle about 2 cm thick. Chill.

Note: You have to work fast because though your butter has to be soft enough to flatten, you cannot let it get too soft while you are folding it. Tip: don't work in a hot kitchen (i.e in the late morning/afternoon) and use a cold surface (like marble or tile).


Back to the dough.
Once the dough has chilled for a good 40 mins, place the ball on a lightly floured work surface and unfold the four segments that you cut into flaps earlier so your dough looks like a four-leaf clover (mine wasn't too pretty but, come on, it was my first go, right?). The centre should be slightly thicker than the "arms".

Now place the butter in the middle section of the dough (the mounded section) and fold in the arms, stretching the pastry in order to fully cover the butter.

Lightly tap the top of the pastry with a rolling pin to seal the edges and to enlarge and flatten the square a little. Next, roll out the pastry (one direction only, please) to a long rectangle. The edges of the rectangle should be even and straight: mine were not!!!

Now, roughly (in your mind) divide the rectangle into three segments. Fold the bottom third of the rectangle up toward the centre, aligning the edges. Then, fold the top third down: the edges should  meet.

Turn the square 90 degrees to the left (for maximum rising, always rotate the pastry in the same direction) so that the fold is at the side. Now, roll out the pastry into a long rectangle and repeat.

If you cannot work fast enough and you feel the butter getting too soft to handle, chill the buttery dough for about 20 - 30 mins till it hardens a little.

Repeat at least four times.

OK. My step-by-step pictures aren't pretty so have a look at the diagram which I got online.


Better? Yup. Meanwhile, I looked down at my ankles and noticed that my appendage (Mojo) was no longer around. He'd given up and was fast asleep in his cot.


I was really psyched that my pastry turned out well. I could actually see the thin layers of dough and butter. I was on a high. So high was I that the next day when the pastry was ready for use, I made four (yes four) different types of pastries!  


That's the preview. Lookout for the individual posts soon!


Monday, July 19, 2010

Guarding my cuppa (corn)


Corn is one of my all-time  favourite comfort food. Simple steamed sweet corn, seasoned with salt, pepper and a sprinkling of herbs and eaten out of a cup in front of the TV.  It has to be that way, only then is it my perfect comfort indulgence.

Strangely, I haven't much eaten steamed corn in a while. It's not that everything's all hunky dory with my life; more like I've been too spoilt for choice these days and consumed by my newfound hobby: baking.

Still, you never can forget true love and it took very little to jog my taste buds into attention. Last Friday, after watching the almost unbearable new Predators flick starrting Adrien Brody (this is totally my opinion, of course), I was feeling completely unfulfilled. Wish Arnie would stop mucking about and get back to Hollywood already. Anyways, as I was walking petulantly down to the carpark, I spotted a food stall selling steamed sweet corn. Now, steamed sweet corn as a "fast food" snack emerged sometime in the late 1980s. Back then, a cup was only RM1. This little stall was selling a really small cup for RM3.5o. Sure, there were many flavours (compared to thos days when the choice of seasoning was only salt and pepper. This exhorbitant corn had several choices of flavours: original (salt), lemon and pepper, cheese and lemon and chilli.

I stuck to the original. Not because I lack a sense of adventure but rather, I've learnt that when it comes to corn, it doesn't pay to be adventurous. A couple of years ago while traveling in India, I tried a local version of steamed corn: masala (mixed spice) corn. It wasn't vile but I vowed never to try exotic flavoured corn. The masala spices overpowered the natural flavour of the sweet corn and I tasted all spice and no corn.

From then, corn went only with salt and pepper ... and melted butter, of course. Last night, I decided to throw caution to the wind (am exagerating, come on!) and added some fresh thyme to the corn once it had steamed. Lovely. So for now, subtle hints of herbs are an accepted extra to my cuppa sweet corn.

Related Posts with Thumbnails