Showing posts with label rosemary. Show all posts

Wednesday, June 12, 2013

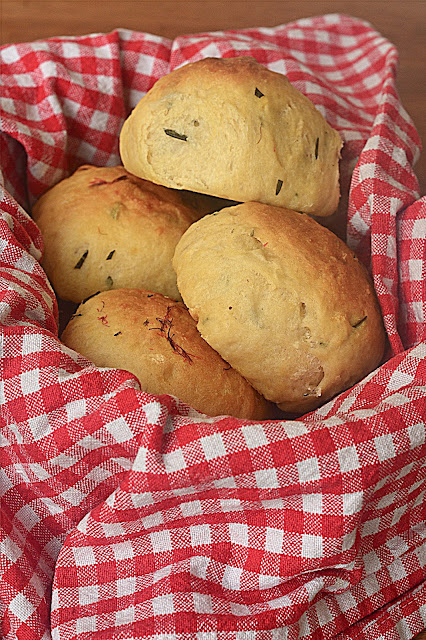
Rosemary and Lemon Buns


I made a lemon tart with a rosemary filling last week and absolutely loved, loved, loved the pairing of the two in the creamy tart. Rosemary and Lemon, what a pair. Definitely a coupling I intend on exploiting further. 

I forged straight ahead and combined the two in a soft bread. 

I reverted to the tangzhong bread method which I knew would yield a really light, soft, pillowy bread. I wanted a sweetish bread - one that I could eat on its own with no need for a filling or a spread. Just bread with the additional flavours all mixed in already. 

Speaking of additional flavours, I had some leftover saffron-infused double cream which I'd used in my version Yotam Ottolengi's Broad Bean Kuku (frittata) and so I decided to use cream as the liquid for my buns instead of a water/milk combination I usually go for. 

Can you just imagine it? Cream, cheese, saffron, rosemary and lemon. My oh! my.


Rosemary and Lemon Buns

For the roux
2 tbsp flour
2 tbsp custard powder
60ml milk
60ml water

For the loaf
350g bread flour
2 tbsp milk powder
4 tbsp sugar
1/2 tsp salt
1 tsp instant yeast
1 egg
80ml saffron-infused cream (heat milk+1 tsp saffron threads till boiling and let sit to infuse for 30 mins)/milk (set about 3 tbsp aside to brush on your bread)
40ml water
roux
30g butter, softened
2 sprigs rosemary, chopped fine
zest of 1 lemon

Mix the ingredients for the roux together till smooth. Put the mixture in a saucepan on the stove until it thickens to the consistency of mayonnaise, more or less. Leave to cool.

Mix the flour, sugar, milk powder, salt together. Add the yeast and whisk it in too. Add the egg and the cooled roux and mix it into the flour mixture with your hands. Add the cream/water gradually and bring everything together to form a rough dough (it won't be smooth - as long as it comes together, it's fine).

Cover and leave to proof for 10 mins.

After 10 mins, uncover and add the softened butter and gently knead it into the dough until it's well incorporated. Knead the dough a couple of times by gently stretching the dough with the heel of your hand and folding it over. Turn it 90 degrees and repeat. Cover and allow it to rest for another 10 mins.

Once it's rested for 10 mins, knead the dough a few times (maybe for about 3-5 mins) and then cover. Repeat this another three times. The sough should expand a little each time.

Once the final knead has been done, cover and let proof for about 45 mins to an hour or until doubled.

Gently punch the dough down with your fist (be gentle) and shape as you desire: a loaf or buns as I did.

Place the buns/loaf in the baking pan and let it sit for about 20-25 mins for it to rise one final time. Brush the cream you kept aside on the bread.

Bake in a 180C pre-heated oven for about 20-25 min (a little longer if its a loaf) or until golden and cooked through (check the underside of the loaf if you are unsure).



Monday, June 10, 2013

Tarts, tarts, tarts


For our monthly Don't Call Me Chef column which is published in Star2 today, we decided to derive inspiration from nursery rhymes. My nursery rhyme of choice was The Queen Of Hearts rhyme made popular by Lewis Carroll's Alice in Wonderland. 

The Queen of Tarts she made some tarts
All on a summer day
The Knave of Hearts, he stole those tarts
And took them quite away

I like this rhyme but more than that, I love tarts. It's my go-to party dish at the moment. For dinner, tea or breakfast/brunch, I'm surely gonna make you a tart should you come by my way.

For the column, I made a Dark Chocolate Rum Tart inspired by master baker Dan Lepard's Pecan Crust Bourbon Chocolate Tart which you can view in his post in The Guardian some time back. 


Let me tell you: it was delicious! Decadent! You won't be able to stop at one. You may not want to share it with your guests! 

I made a few minor adjustments: he uses bourbon, I used rum; he uses cane sugar I used palm sugar and I also added some sea salt into the chocolate. I also made a chocolate-walnut crust (adding more cocoa than Lepard uses) instead of a pecan crust. 

You can check out the recipe for the Chocolate tart I made here.

Yesterday I made another tart: a Lemon Mascarpone Tart with a Rosemary crust and sour cream topping. 


Like most lemon tarts/slices, this one is tangy and very lemony. It's also creamy because of the mascarpone. The sour cream topping helps soften the tartness of the lemon filing - especially if you're not a huge fan of lemons. 

The filling is not cooked and thickened to form a curd. Though slightly runny, the cheese helps it set quite quickly. 

The recipe was inspired by one I saw in the food section of The Telegraph's site. I added the rosemary (because at the moment, rosemary and lemon is my favourite couple) and the sour cream.

The tart is best eaten chilled.


Lemon Mascarpone Tart with Rosemary Crust

For the pastry
100g plain flour
50g icing sugar
70g ice cold butter, cubed
1 sprig rosemary, chopped fine
pinch of salt 
4-6 tbsp ice cold water/milk

Filling
2 eggs
2 egg yolks
juice and zest of 2 lemons
125g mascarpone cheese
100g castor sugar
3 tbsp sour cream

First the pastry. Whisk the flour, salt and rosemary together. Add the cold butter and with your fingers or a mixer, rub the butter into the flour until you end up with a mixture that resembles breadcrumbs. Add the cold water a little at a time and work quickly to form a dough. Shape into a disc, wrap in cling film and chill for at least 30 mins.

Once chilled, roll the pastry on a floured surface until about 2mm thick. Lift the pastry carefully and fit into tart tin (I used an 8-inch tin). Prick the bottom and sides of pastry with a fork and blind bake in a 180C oven for about 12-15 mins or until the base has hardened slightly. 

Remove. 

For the filling, beat the eggs and sugar until the mixture gets pale and creamy. Add the mascarpone and the lemon juice and zest and mix to incorporate all ingredients together.

Pour the filling into the half-baked crust and put it back in the oven for about 20 minutes or until the filling is set.

Remove from oven and let cool. Once cool. spread a thin layer of sour cream on top.


Saturday, March 16, 2013

Rosemary Lemon Cake with Sea Salt


Salt isn't an ingredient that is usually associated with desserts. Sure, practically every cake and pastry recipe includes the customary pinch of salt which is supposed to enhance and awaken inherent flavours. Try making a chocolate cake WITHOUT salt: it really does taste quite flat. Add a pinch or two of salt, about a teaspoon, and the chocolate comes alive.

Salt is essential in desserts but with a pinch, we don't actually taste the salt.

What if we add more than a pinch? What if we want to taste the salt to contrast against the sweet? Salty desserts are nothing new: salted caramel desserts have become the rage over the last couple of years, but Asian desserts have long played up the salty/sweet contrast: one of my favourites is Tau Sar Piah, a deliciously flaky pastry stuffed with a sweet/savoury mung bean paste. Another is the Thai sticky rice and mango pudding: the sweet and salty sticky rice that's drenched in coconut milk and eaten with sweet mango? Oh ... so delicious. 

A while ago at a food fair I participated in with Jane of The Wayward Oven and Sree, another friend (we sold sliders - nothing sweet about them!), I had the chance of sampling a Rosemary and Maldon Sea Salt yellow cake baked expertly by the fabulous baker boys of Just Heavenly. The cake literally blew me away. I didn't ask for the recipe, of course, but I've been thinking about it ever since that fateful day last September. Yeah, that's a long time to be thinking about one cake!

Last week, I decided to try adding the same flavours in a lemon butter cake. 


The cake turned out super! 

I had to make it twice to get the right amount of rosemary and salt to balance the sweetness of the lemon and the richness of the butter. The first time around, I didn't quite use enough rosemary: I stinged as I was afraid the strong taste of the herb might overpower the cake. It didn't. It was barely discernable and so I doubled the amount, using two sprigs instead of just one. 

The flavour of the rosemary is subtle, giving the cake just a little kick with its of fresh, piney taste while the salt not only gives you an unexpected hit but also cuts through the richness of the butter in the cake. 

Texturally, sprinkling the sea salt on the cake adds not just flavour but texture to the crust... and who doesn't love a delicious crust on a butter cake? I used the Fleur de Sel de Camargue which Ivy (The Hungry Caterpillar) bought for me from Europe some time back. I've been using it sparingly but this recipe called for the best. But, Maldon sea salt flakes (readily available at most big grocers here) works as well. Sea salt works better than table salt as it has a softer flavour that is more brine-y, less salty.


Rosemary Lemon Cake with Sea Salt

250g butter, softened
250g Castor sugar
1 tsp vanilla extract
3 eggs
310g self raising flour
2/3 cup milk
zest of 1 lemon
2 sprigs rosemary
sea salt to sprinkle

For the glaze
1 lemon
1/2 cup icing sugar, sieved

Preheat the oven to 180C.

Line a loaf pan with grease proof paper and lightly rub the paper with butter.

Heat the milk, lemon zest and rosemary until the mixture begins to simmer. Take it off the heat and leave to cool, allowing the rosemary and zest to infuse into the milk (for at least 15 mins). When cool, strain the mixture and keep only the milk.


Cream the butter and the sugar until pale and fluffy. Add the extract and the eggs, one at a time and beat (on a lower speed) till incorporated. 

Add the flour and the milk, alternating between the two in three installments.

Pour the batter into the lined pan, smoothing the top and dropping the pan on the counter a couple of times to remove any air bubbles.


Sprinkle the top with sea salt.

Bake for 40-45 minutes or until a skewer comes out clean.

Once the cake is out, prepare the glaze by just mixing the sugar in the lemon juice till smooth. Drizzle the glaze on top of the cake while it is warm.

Sprinkle a wee bit more sea salt on the glaze and leave to cool before removing from the pan.

Monday, December 27, 2010

Oliver without the twist


He makes everything look so easy! Or, in his words, easy peasy.


Yup, I am talking about Jamie Oliver. The scruffy, multi-millionaire British chef who became a celebrity with his cooking show, The Naked Chef. Thankfully, he doesn't really strip down in the show. No... the title "Naked Chef" wasn't even his idea, apparently. His producers thought it a clever way of marketing his style of cooking: the no frills, no fuss way of cook. Jamie's was among the first of its kind, a stripped down cooking show about how anyone can just "chuck" a few gorgeous ingredients together and come up with a superb dish.

Yes, Jamie is full of superlatives.

I've been following Jamie on TV off and on for a while. Only "off and on" because I find  I can only take Jamie in small doses. Don't ask me why exactly, its just one of those things.. I've bought some of his books too although its been a while since I touched them.

And then I had a dream of him. The result of watching too much of Top Chef I think. In the dream, I was in a cooking competition and Jamie was a competitor. We were neck in neck in every round. I woke up before the final round of the competition but since it was a dream, I reckon I won. Ha ha.

Anyway, it got me thinking about Jamie. So, I took my Jamie books off the shelf and began looking for recipes that appealed to me. It was my turn to write the cookbook review for Don't Call Me Chef (a column I co-produce with Marty Thyme and Hungry C) and so I decided I'd write about Jamie since he was my present focus.


As I tried a number of his recipes out, I remembered why I bought all those books. The boy can cook. His recipes are easy and always turn out well. The food always tastes fantastic. They aren't exactly sublime (that's fancy talk for fancy gourmet food) but they're good wholesome food that is good for a family dinner or a feast. Your friends will be impressed.

I tried out more than a dozen recipes in just one week. My favourites were the Sweet Garlic, Bread and Almond soup which I wrote about in the book review and these Focacia loafs which I kinda played around with.Both are from the book Jamie's kitchen.
  

Jamie's recipe was for a tomato focacia for which he used cherry tomatoes: green, red and yellow tomatoes and basil. I had some basil but I didn't have any cherry tomatoes. What I did have was a whole bowl of chunky tomato sauce which I made a couple of days ago to douse some burgers in. I decided to use the sauce instead.

I also decided to make two types of focacia instead of one. My new favourite flavour is that of roasted garlic so I decided to go with roasted garlic and rosemary.

I've made focacia before and though it wasn't too complicated, Jamie's recipe simplified it further. It really was easy peasy and the result was a deliciously soft  bread that can be eaten like pizza: on its own sans any spreads, topping, dips or filling. Just smashing.


Focacia, two types

A: Prepare the bread dough
1 tbsp instant yeast
1 tbsp honey
315 ml tepid water (you may need about 50 ml more, depending on the flour)
500g bread flour
1 tbsp salt
some extra flour for dusting

Dissolve the yeast and honey in half the tepid water.
In a bowl, mix the flour and salt. Make a well in the centre and pour in the dissolved yeast mixture. With four fingers of one hand, make circular movements from the centre moving outwards, slowly bringing in more and more of the flour until the yeast mixture is soaked up.
Pour the remaining water into the centre and gradually incorportae all the flour to make a moist dough.
Now its time to knead. Roll, push and fold the dough over and over for 5 mins. This develops the gluten and the structure of the dough. If the dough sticks to your hand, rub a little flour and go on.
Done? Flour both hands and the top of the dough and shape it into a footnall. Place it on a floured surface, cover with clingfilm and allow it to proof till it doubles in size: about 40 mins.

B Prepare the toppings
2 cups cherry tomatoes
handful of basil
5 tbsp olive oil
salt and pepper
With a small knife, core the tomatoes. Score the tomatoes in boiling water for about 30 seconds. Remove with a slotted spoon and peel off the skin. Cut in half and remove seeds. Place in a bowl with 1 tbsp olive oil. Cover.

2 heads garlic
1 tbsp dried rosemary
5 tbsp olive oil.
Roast two heads of galic in the oven at 180C for 30 mins. Cool and squeeze out the jammy garlic from the skin. Set aside.

C. Back to the dough
Once the dough has doubled, remove cling film and knock the air out of the dough but punching it with your fingers. Divide into half. Place on a floured surface and roll both out till 2.5 cm thick. Transfer onto oiled trays.
Pour the olive oil over. Place the tomatos and basil/garlic and rosemary and push your fingers to the bottom of the tray accross the whole expanse of the dough. Use your fingers like a poker: push them through and flatten them out when you hit the tray. This gives the bread the classic focacia shape with indentations all over. 

Let it double again and bake in a preheated oven (220C) for about 15 to 20 mins till the outside is nice and brown and crispy and the inside is soft.

Drizzle some olive oil on top when out of the oven. Cook and eat.    

Related Posts with Thumbnails