Showing posts with label nuts. Show all posts

Tuesday, October 30, 2012

Mushroom, Cheese and Hazelnut Mille Feuille


Mushrooms. Puff pastry. Cream Cheese. Hazelnut cream. Each of these components sound (and taste) delicious! But, want to know what happens when you put them together in a savoury Mille Fueille? Yep, you are right. An out-of-this-world amazing blend of flavours and textures in each bite!

Last month's Daring Bakers challenge had us making puff pastry from scratch for a mille feuille. It was a fun challenge and I discovered how uncomplicated making puff pastry really is, dispelling all the myths about how it's close to impossible for home cooks to attempt. It's not! It's an achievement, yes, but it's not too difficult. It does however require time and patience. Check out my previous post for more details on making your own puff.

So, after completing the challenge — I made a mixed berries and cream mille feuille — I had some left over pastry which I'd already baked and cut into sheets. I popped them in the freezer because in the process of deciding on what I'd make for the challenge, I came accross a recipe for a savoury mille feuille which I wanted very much to try. There were three fillings for that mille feuille: mushrooms and herbs, goat cheese and chives and caramelised onions. Oh and then there was the hazelnut cream that was drizzled on top of each layer.

It looked and sounded fantastic (you should really check it out). I wanted to recreate the original but I  didn't have quite a few of the original ingredients and so I decided to improvise and use ingredients I had on hand. After all, as with most things, it's the idea and the essence of a dish that counts the most, right?


The first thing to go was goats cheese. A shame, really, as  love goats cheese. Actually, I love all cheeses but I didn't have goats cheese at home so I opted for the cream cheese which I had an abundance of in my fridge. I had chives so I added that to the cream cheese along with a few drops of lemon juice.

Next, I love caramelised onions. Really, I do. But I wasn't in the mood today to nurture them over a slow fire for close to an hour. I decided to omit the onions, certain that the mille feuille would taste just as fantastic without that one component. 

There were a couple of other ingredients which I didn't use: hazelnut oil and thyme -- both of which I also didn't have. I used olive oil instead and my all-time favourite herb: parsley. Oh!And I added chilli flakes.

Never too many mushrooms, I believe.

I don't know what the original tasted like (am sure it was nothing short of heavenly) but I was soooooo pleased with the flavour of my version: the Mushroom, Cream cheese and Hazelnut mille feuille.The thick, creamy cheese with chives against the crisp buttery pastry was one layer of goodness. Add to that a generous layer of sauteed mushrooms (with garlic, parsley and chilli)? That's the second layer of goodness. Now, top that with a thick drizzle of hazelnut cream. My, Oh! my! I think hazelnut cream has become my new favourite thing.

The hazelnut cream on top is a little thicker than intended but I ran out of cream! Still good, though!
Mushroom, Cream Cheese and Hazelnut Mille Feuille

Puff pastry (2 large sheets)
 For the mushrooms
2 cups mixed mushrooms (any type, sliced thin)
Parsley, a handful chopped fine
1 clove garlic, chopped fine
Chilli flakes, a sprinkling (depending on your heat tolerance)
Butter for the pan.
salt and black pepper.

For the cheese paste
3 tbsp cream cheese, softened
1 tbsp finely chopped chives

For the hazelnut cream
1/3 cup hazelnuts, skinned and roasted
1/3 cup heavy cream  
2 tbsp olive oil
salt and black pepper


Heat the oven to 180C. Cut the sheets of puff pastry into long strips, about 3 inches wide. Place on a baking sheet. Place a sheet of parchment paper on top of the sheets of pastry and weigh it down with a heavy baking dish. Bake for about 25 mins. Remove the baking dish that's used as a weight and the parchment paper and bake for a further 5 mins till golden on top. Remove and cool.

Heat a skillet and add the butter. When it melts, add the garlic and a few seconds later, the mushrooms. Allow the juices to flow out of the mushrooms and add the chilli flakes. Keep the shrooms on the heat until the moisture disappears. Just before removing it from the stove, add the parsley and season.

Put the hazelnuts and cream in a blender and whiz till the nuts are almost all blended. Pour in the oil and seasoning and whiz some more. Remove.

Mix the cream cheese and the chives till well incorporated.

Assembling the mille feuille.
Cut the pastry to equal portion sized rectangles. Take one rectangle and spread a thick layer of cream cheese on it. Pile a layer of mushrooms on the cheese and then drizzle the hazelnut cream over the shrooms.

Repeat. this and then pile one layer atop the other.

Place a third sheet of pastry over the two layers and garnish with some cream, chopped nuts and parsley. 

Friday, October 5, 2012

Kek Batik (Revised)


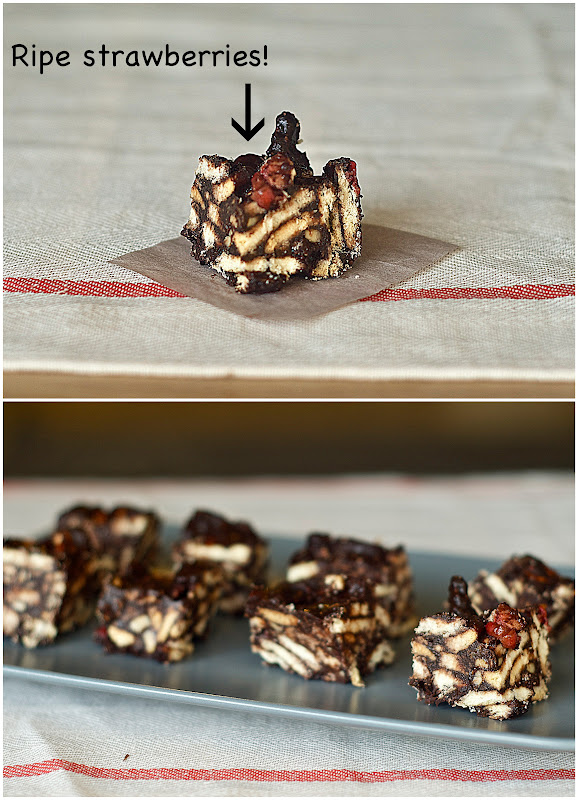
In Australia, this desserts (or a variation of it) is called a hedgehog. In Malaysia, we fondly refer to it as Kek Batik. Essentially, both are frozen no-bake desserts that combine melted chocolate with biscuit pieces/crumbs. They are insanely easy to make (honest to goodness, folks) and they are even easier to gobble.

Home cooks often put their own spin on recipes, as I discovered when I asked a few friends about how they made this delicious dessert. (Though I grew up eating Kek Batik in friend's houses, I'd never made it until very recently and so I had to do some research).

The common ingredients are chocolate and biscuits, the type of chocolate and biscuits used different considerable. Some cooks use cooking chocolate, others use cocoa and some others use Milo. As for the biscuits, most used the modest Marie biscuit (available at almost every grocery or sundry shop) while some used oat biscuits or ginger snaps. Oooooh.

Some cooks use condensed milk to help bind the ingredients together. Some use a single egg. Some use both.

I was a little lost at first but then I decided to stick to the staples: dark chocolate and Marie biscuits and experiment with the rest.


I decided not to add condensed milk. It's toooooo sweet and I am on a diet goddammit! I included the egg. If your alarm bells are ringing — adding an egg in a no-bake dessert??? — rest assured, the egg is added to the chocolate as soon as it is melted over a double boiler with some butter. The chocolate-butter mixture is hot and the raw egg should be mixed quickly into it to avoid scrambling.

I also decided to add some nuts (roasted cashews, unsalted) and also fruit (strawberries) instead of added sugar into my dessert.

Guess what? It was amazing. The tiny bits of strawberry and the nuts added texture and depth to an already tasty treat. And the pink bits of strawberries peeking through was just so pretty.


Kek Batik (Revised)

400g dark cooking chocolate, cut roughly into pieces
200g butter
200g Marie biscuits
1 cup chopped roasted cashews
1/2 cup strawberries, cut up into tiny pieces
1 egg

1 square/rectangular baking dish

Melt the chocolate and butter in a bowl over a pot of boiling water. Once both are melted and combined, take it off the heat (it should be nice and shiny) and quickly stir in the egg. 

Break up the biscuits and mix in the nuts and berries in a bowl. Pour the chocolate mixture over the biscuits and mix to combine well.

Transfer the mixture into a square/rectangular baking dish and press down hard. Refrigerate or freeze to set. 


Monday, June 7, 2010

Nuts about ... nuts


It's really quite amazing what some of my friends and family are doing to gear up for the World Cup this Friday. Buying jerseys to support their favourite teams, placing bets and even purchasing High Definition TV sets -- World Cup fever is definitely here and temperatures are high. Now, since the TV is going to be everyone's  best friend for the next month or so there is one other thing to prepare: snacks to eat while watching the games. I'm a TV snacker so this is of prime importance for me.

It is in this vein that we decided to devote this months Don't Call Me Chef (a monthly column I write with Marty Thyme and The Hungry Caterpillar in The Star) on munchies for the World Cup. Over the last couple of weeks I've been preparing my repertoire. For the column, I made yummy cheese straws: they're addictive, let me warn you. I also made sweet potato home fries, onion rings, breaded mozzarella sticks and breaded tempe sticks (an alternative for vegans) for this blog.

Today I decided to bake some nuts. Regular nuts are great but I also like coated nuts, the spicier the better.


You need raw, skinned peanuts and a batter to coat them in. For the batter, I mixed plain flour, 5 spice mix, salt, pepper and sugar. To bind the nuts with the batter, I used an egg with some minced garlic.  First, beat the egg with the garlic (3 cloves). Pour the egg over the nuts (300 gms) in a bowl and mix. Whisk together the flour (75 gms), 5 spice powder (1/2 tbsp), salt (1tsp) and sugar (1.5 tbsp). Add the dry ingredients to the egg coated nuts and mix well. Though I usually use my hands to mix my ingredients, I recommend using a spoon as the batter gets sticky making it a little bit tricky mixing everything together.

Now you can either fry the nuts or bake them. Both ways are good but I opted for the oven as it was a slightly healthier option. Heat the oven at 180C for about 10 mins. Spread the nuts on a greased baking sheet and slide the tray onto the middle rack. Bake for 10 or 15 minutes, remove tray, toss the nuts and put it back in for another 5-10 mins. Remove when the nuts turn golden and crispy. If you prefer frying, heat a saucepan with oil. When the oil is hot, spoon the nuts (a little at a time) into the oil and fry till golden. You will have to turn them midway. Remove with a slotted spoon and drain oil on a paper towel.


You can season the batter with a host of other spices. Chilli powder or curry powder work too. If you like the coconut cream coated nuts, you can substitute half the egg with thick coconut milk. The thing to remember is not to add too much egg/coconut cream as the batter has to be sticky and stick to the nuts. If you accidentally add to much liquid, just add on a spoonful or so of flour.

That's it. Takes just about 25 minutes to make and 300 gms should see you through one match.

Saturday, May 8, 2010

Butter me nutty


After seeing the creamy nut butters featured in the April-May issue of Flavours (a food magazine) I knew I had to make some for myself. Homemade nut butters? Oh my, I was as excited as those pre teen and tween girls at the Tokio Hotel concert just last week.  And as I peered into the blender as the butter was being processed, I too was in tears as those screaming groupies of the German band.

I was a wreck. An emotional wreck.

I was particularly pleased because I didn't have a high-powered blender and used my reliable just-barely mid range Philips blender, praying all the while that the motor wouldn't give way. I love you, my Philips blender. Thank you.

I never realised how simple it is to make nut butters -- peanut butter, almond butter, cashew butter, hazelnut butter... you name it. All you need is some fresh good quality nuts and a little bit of salt and a sturdy blender.

The catch is that the nuts (except for the modest peanut) can be pretty expensive and making a jar of these creamy beauties can cost you close to RM12.  Oh, well. the satisfaction and the rich creamy spread you get is all the payoff you need.


What you  need is 400g of your choice nuts. I used almonds. First, you roast them in the oven: it's up to you if you want it slightly roasted or if you prefer a dark roast. I chose a dark roast. Although you can opt not to use unroasted nuts, the roasting process helps release some of the flavour from the nuts, hence your  nut butter will be richer.  So, if you want just a light roast, heat up your oven to about 120C, spread the nuts on a flat tray and roast for about 10 mins. for a dark roast, leave it about 5 mins longer or till they brown.

Remove and let cool a little. Transfer into a blender and add a pinch of salt and blend. And blend. And blend. First, will be the grinding and you will see your nuts turn to coarse powder. Blend some more and you will start seeing the crumbs get creamier, and creamier until they resemble a thick buttery paste. A high-powered blender will, naturally, yield results faster. My basic Philips took a while longer (about 20 mins) with some one minute rests in between (I really was afraid the motor would go bust).

Most store-bought nut butters have some kind of hydrogenated vegetable oil, sugar  and colouring to enhance the taste and texture. Home made nut butters are pure nut butters although you may add some like-flavoured liquers (like amaretto for the almond butter) to enhance the taste. I didn't have almaretto at home, dang-it, so mine was totally original.

So, it's goodbye peanut butter and jelly sandwiches (for a while) and ola to almond butter/jelly! Oh, and almond butter cream cookies. And almond butter slices, perhaps!

Wednesday, December 16, 2009

Candied Walnuts rock my world

[caption id="attachment_517" align="aligncenter" width="500" caption="Syrupy walnuts: a treat that can't go wrong."][/caption]

I rarely have  any deserts at home. No biscuits  (do saltines count?), no chocolate, no cake. I have a quarter tub of ice cream in my freezer but it's been there for a while  -- remnants of  a get together with my cousins some months back. yes, months. Anytime I make a desert, it's for someone else.

What you will find in my pantry are nuts. Cashew nuts, pecan nuts, peanuts, walnuts ... even candle nuts for cooking curries.

So when my friend called to ask if she could drop by for a bit -- her daughter wanted to play with my dachshund Mojo, I panicked. What would I offer the kid to eat?

I did a quick inventory of what I had.   Saltines? Get real.  Apples? The kid would probably kick me. Old ice cream? Her mum would probably kick me. Instant noodles? That's just pathetic. Then I recalled a jar of walnuts and a recipe for candied walnuts I bookmarked some time back. The kid would like it, right? Oh well, she'd just have to.

Kid came. Kid payed with dog. Kid drank soda and then I brought out the nuts. She looked at them suspiciously, reached out her hand and picked one small syrupy walnut.

Ten minutes. Thats how long it took her to finish the bowl of nuts. Heck, she didn't even keep some for me. I know I don't like desserts, but I love nuts, candied or not.

Oh well, better me deprived of nuts than an unhappy kid without a treat. So maybe this X'Mas, you can ditch the candy cane for some candied walnuts.... ya think?
Candied Walnuts


1/2 cup brown sugar

1/4 cup water

1 1/2 cups raw walnut,  halved

pinch of  salt

pinch of cinnamon


Preheat oven to 180°C. Spread the walnuts on a baking sheet and bake for 5 - 7 minutes or until toasted. Just be sure not to burn them. Remove and cool.  Mix sugar and water in a saucepan and cook on medium hear, stirring. When the sugar has melted, add the  walnuts and stir, making sure all the nuts are coated with the sugar before it hardens.  Once they're all coated, remove from heat and spread on a baking sheet lined with wax paper. Sprinkle the nuts with the salt and, if you wish, cinnamon. Seperate those that are sticking together and let them cool.

More desserts at Nodessert? Look at

Monday, October 12, 2009

Nuts about granola

I love muesli and granola; more so if they come in the form of a bar and are coated with yoghurt of filled with nuts. For a while, muesli bars were all I ate for at least a month. Then I found something else I loved (will save this for another post).  Anyways, Ifound myself spending a ridiculous amount of money on granola bars -- they aren't cheap; well, not the really good and tasty ones. So I decided to look for a great recipe  for granola/muesli bars and make my own bars. I consulted one of my all time fav cooks (Martha Stewart) online ... well, I went to her website ... and a couple others and made my very own granola bar. And I haven't bought a store bought bar in quite a while now.

[caption id="attachment_6" align="alignnone" width="468" caption="Save a bundle; make your own"]Save a bundle; make your own[/caption]

If you want to try it:

Delicious bars ♣


1½ cups rolled oats
2½ cups pine nuts, cashew nuts, walnuts or any other nut
2 tbsp butter
1 heaped tbsp apricot (or any other) jam
1½ tbsp maple syrup
¼ cup brown sugar
½ tsp salt
¾ tsp ground cinnamon


Lightly toast the oats and nuts (you can add pumpkin seeds, raisins and dried
fruit too) in a skillet till aromatic. Transfer to a mixing bowl. Melt butter in a skillet and mix in jam, syrup, sugar, salt and cinnamon. Cook till it thickens and starts bubbling. Pour into the toasted mixture and combine well. Transfer to a 17cm baking pan (lined with cling film) and press the mixture flat and tight. Cover and refrigerate for 20-30 minutes to set. Cut into bars or squares and enjoy!

Related Posts with Thumbnails