Showing posts with label cream cheese. Show all posts

Sunday, February 24, 2013

Deep Fried Butter


Paula Deen is one of my guilty pleasures.

There! I've said it. I guiltily tune in to her show on TV to watch as she creates Southern-style dish or other that almost always has butter or cream or both. And don't get me started on all that deep frying and all that sugar!

Some classic Paula meals? A brunch burger that comprises a hamburger patty, sliced bacon and a fried egg in between two halves of a GLAZED DOUGHNUT! And there's the deep-fried cheesy lasagna. Oh! Wait... there's more: A cheesecake WITH white chocolate that's wrapped in a pastry that is coated with egg and DEEP FRIED! The fried cake is then dusted with powdered sugar! Holy smokes. I may need to catch my breath after that one.

As flabbergasted as I sometimes am at her artery-clogging, full fat recipes, they do sound really appetising. Well, maybe not the cheesecake ... that just sounds scary. But often, I find myself wanting to reach through my TV screen to just grab a taste of what she's served up. Her lemon linguini with butter, sour cream and cheese, for example, just sounds too good. As does her three-cheese artichoke dip.

There was one recipe in particular that I've wanted to try for a very long time. I actually first saw it on a programme on the food channel about the food that come out of state food fairs in the United States. Of all the deep-fried concoctions, one stood out: deep fried butter. A stick of frozen butter was impaled on a stick, coated with batter and deep fried.

What? My head was spinning at the idea of deep fried butter.

Then I saw it on Paula's show. Her way is slightly different. She mixes softened butter with some cream cheese, freezes the mix and then deep fries it.

I had to make it. I was curious. I just had to try it.

Of course it tastes great. Of course I was tortured with guilt at every bite but it was just so good. (I rationalised that if I only ate two pieces, it's about the same as eating a piece of toast with lots of butter! He he he.)

So here it is. A sometimes snack which I vow to make sparingly. Just so good!


Deep Fried Butter Balls
125 gm butter, softened
50g cream cheese, softened
1 tbsp chopped parsley
1 tsp chilli flakes
For coating
1 egg, lightly beaten
1 cup flour
2 cups bread crumbs

Mix the softened butter, cheese and parsley together till well incorporated. Spoon the mixture into balls and freeze for at least 30 mins or until hard.

Coat the frozen butter balls: roll them first in flour, then egg, then bread crumbs. Work swiftly so the butter doesn't get too soft. Repeat.


Freeze the coated balls again for at least 30 mins or until hard.

Heat some oil in a pan (enough to submerge the balls). When the oil is hot (about 180C), drop the balls in and fry till golden, about 15-20 seconds. Remove onto paper towels and serve. Some butter may leak out but if the balls are well coated, this should be minimal.

Enjoy! 

Tuesday, October 30, 2012

Mushroom, Cheese and Hazelnut Mille Feuille


Mushrooms. Puff pastry. Cream Cheese. Hazelnut cream. Each of these components sound (and taste) delicious! But, want to know what happens when you put them together in a savoury Mille Fueille? Yep, you are right. An out-of-this-world amazing blend of flavours and textures in each bite!

Last month's Daring Bakers challenge had us making puff pastry from scratch for a mille feuille. It was a fun challenge and I discovered how uncomplicated making puff pastry really is, dispelling all the myths about how it's close to impossible for home cooks to attempt. It's not! It's an achievement, yes, but it's not too difficult. It does however require time and patience. Check out my previous post for more details on making your own puff.

So, after completing the challenge — I made a mixed berries and cream mille feuille — I had some left over pastry which I'd already baked and cut into sheets. I popped them in the freezer because in the process of deciding on what I'd make for the challenge, I came accross a recipe for a savoury mille feuille which I wanted very much to try. There were three fillings for that mille feuille: mushrooms and herbs, goat cheese and chives and caramelised onions. Oh and then there was the hazelnut cream that was drizzled on top of each layer.

It looked and sounded fantastic (you should really check it out). I wanted to recreate the original but I  didn't have quite a few of the original ingredients and so I decided to improvise and use ingredients I had on hand. After all, as with most things, it's the idea and the essence of a dish that counts the most, right?


The first thing to go was goats cheese. A shame, really, as  love goats cheese. Actually, I love all cheeses but I didn't have goats cheese at home so I opted for the cream cheese which I had an abundance of in my fridge. I had chives so I added that to the cream cheese along with a few drops of lemon juice.

Next, I love caramelised onions. Really, I do. But I wasn't in the mood today to nurture them over a slow fire for close to an hour. I decided to omit the onions, certain that the mille feuille would taste just as fantastic without that one component. 

There were a couple of other ingredients which I didn't use: hazelnut oil and thyme -- both of which I also didn't have. I used olive oil instead and my all-time favourite herb: parsley. Oh!And I added chilli flakes.

Never too many mushrooms, I believe.

I don't know what the original tasted like (am sure it was nothing short of heavenly) but I was soooooo pleased with the flavour of my version: the Mushroom, Cream cheese and Hazelnut mille feuille.The thick, creamy cheese with chives against the crisp buttery pastry was one layer of goodness. Add to that a generous layer of sauteed mushrooms (with garlic, parsley and chilli)? That's the second layer of goodness. Now, top that with a thick drizzle of hazelnut cream. My, Oh! my! I think hazelnut cream has become my new favourite thing.

The hazelnut cream on top is a little thicker than intended but I ran out of cream! Still good, though!
Mushroom, Cream Cheese and Hazelnut Mille Feuille

Puff pastry (2 large sheets)
 For the mushrooms
2 cups mixed mushrooms (any type, sliced thin)
Parsley, a handful chopped fine
1 clove garlic, chopped fine
Chilli flakes, a sprinkling (depending on your heat tolerance)
Butter for the pan.
salt and black pepper.

For the cheese paste
3 tbsp cream cheese, softened
1 tbsp finely chopped chives

For the hazelnut cream
1/3 cup hazelnuts, skinned and roasted
1/3 cup heavy cream  
2 tbsp olive oil
salt and black pepper


Heat the oven to 180C. Cut the sheets of puff pastry into long strips, about 3 inches wide. Place on a baking sheet. Place a sheet of parchment paper on top of the sheets of pastry and weigh it down with a heavy baking dish. Bake for about 25 mins. Remove the baking dish that's used as a weight and the parchment paper and bake for a further 5 mins till golden on top. Remove and cool.

Heat a skillet and add the butter. When it melts, add the garlic and a few seconds later, the mushrooms. Allow the juices to flow out of the mushrooms and add the chilli flakes. Keep the shrooms on the heat until the moisture disappears. Just before removing it from the stove, add the parsley and season.

Put the hazelnuts and cream in a blender and whiz till the nuts are almost all blended. Pour in the oil and seasoning and whiz some more. Remove.

Mix the cream cheese and the chives till well incorporated.

Assembling the mille feuille.
Cut the pastry to equal portion sized rectangles. Take one rectangle and spread a thick layer of cream cheese on it. Pile a layer of mushrooms on the cheese and then drizzle the hazelnut cream over the shrooms.

Repeat. this and then pile one layer atop the other.

Place a third sheet of pastry over the two layers and garnish with some cream, chopped nuts and parsley. 

Monday, August 27, 2012

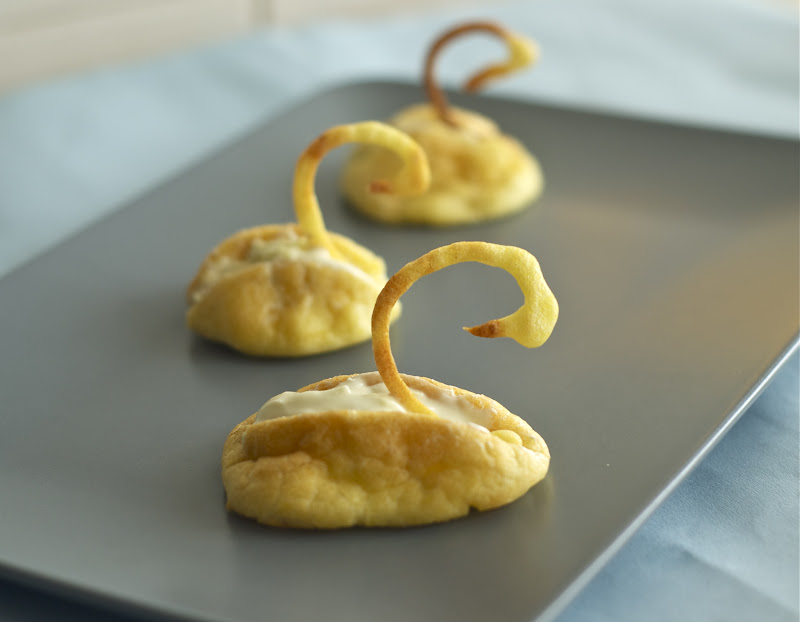
Daring Bakers: Edible Swans


I'm so excited about this post. It's the first time I've participated in a Daring Bakers challenge. Jane (who blogs at The Wayward Oven) has been taking part these challenges for quite a while and I've looked on at her progress with much awe and curiosity. Finally, after about two years (am I right, Jane?) I decided to join in the fun.

The Daring Bakers are a group of cooks/bakers who meet online to discuss and share what they are most passionate about: food. Once a month, a baker poses a culinary challenge for the members of the esteemed group to take part in.

This month, the challenge was set by Kat of The Bobwhites who inspired the group to have fun in creating pate a choux shapes, filled with crème patisserie or Chantilly cream. We were encouraged to create swans but were also encouraged to experiment with other shapes. While Kat provided us with a recipe for the two suggested cream fillings, we had the freedom of experimenting with something totally different. Check out the outcome of the challenge at The Daring Kitchen site.

I had a month to do this challenge but somehow, I didn't find the time until the 11th hour. Isn't that always the case?

So you can imagine what a wreck I was this weekend: my first time doing a DB challenge on a recipe I'd never tried before. Yup, I've never made choux pastry puffs before though they've been on my to-do list since... forever. Well, maybe two years. I've made churros which use a variation of choux pastry but never have I attempted delicate cream-filled puffs or eclairs.


I followed the recipe for the choux pastry provided by Kat very closely. In the instructions to the challenge, Kat said that it was "mandatory" to have fun while doing the challenge. I tried to remember that as I beat the dough to form. I was happy when it came out nice and glossy, shiny yellow ball of dough. 

Ok, since step one was done, I realised I was having a little fun.  I preheated my oven and got to work on the hard part of the challenge: piping the dough. I decided to stick to the challenge and make swan-shapped puffs. To do this, I had to pipe the dough out in two different shapes: the heads of the swans and their bodies. 

The heads turned out easier to do than I'd imagines. Using a 6mm tip, I piped about 20 heads. The shape was akin to that of the roman numeral 2 (see pix below). They couldn't be too thin (as this would make them wilt when assembled) not too thick (for swans have delicate necks). Baking them was a challenge too as they initially didn't brown evenly. I had to turn the tray around midway (the heads took about 5 mins to cook) to achieve some decent shapes. 

Next the body. Using a 25mm tip, I piped a sort of oval onto a lined baking sheet, making sure one end of the oval was fatter than the other. The bodies took slightly longer to cook (about 12 mins) and my initial batches weren't as puffy as I liked them to be. They were kinda limp. I adjusted their time in the oven (left them for a minute or two longer) and that seemed to work better (see pic above). 


Instead of a sweet cream filling, I decided to go rogue and make a savoury filling with cream cheese and chopped herbs. I had chives and parsley in the fridge and I decided to go with ... both!

The outcome: My choux puffs were still a little, err, delicate and I think they could have used still more time in the oven. I read in a forum on cheftalk.com that the puffs collapse if not baked long enough. I may have removed mine a tad early in fear of them browning too much. More work needs to be done on this.

Still, the swans tastes yummy. This seems so wrong for a vegetarian to say ... but they did. The cream cheese filling was delicious as cream cheese fillings almost always are. And though a little soft, the puffs had good flavour.

And those heads! So light and crunchy. I bit them off as fast as I could!

Pate a Choux
(makes about 20 dozen bodies and heads)


115g butter
1 cup water
1/4 tsp salt
4 eggs
1 cup all purpose flour

Line two baking sheets with parchment paper. Preheat oven to 170C. In a small saucepan, combine the butter, water and salt. Keep it on the heat until the butter melts.

Remove from the heat and add in ALL the flour. Beat the mixture until it comes away from the sides of the pan.

Add the eggs one at a time and mix them well into the mixture. The dough should start to get nice and glossy, yellow like the sun.

Now to pipe the shapes. First, the heads. Using a 6mm tip, pipe several number "2" shapes onto one of the lined sheets. Make the top end of the two a little thicker to resemble the head of the swan. Also, add a beak if you wish by adding a dash to it. It sounds odd but when they puff up, they actually look like swan heads! (refer to the pic of the completed ones. Sorry, I forgot to post a picture of them before they went into the oven! Yikes).

Now, using a 25mm tip, pipe out the bodies, an oval with one side thicker than the other. Or, like a drop of water, you know, but with a rounder tip. Ok. does this sounds a little confusing? I promise, I will endeavour to do another mini batch and take pictures of the process!

Bake the heads first for about 4-6 mins. Next  bake the bodies until the puff up and turn a lovely shade of gold. Mine took about 14-15 mins.

TIP: The first batch of my choux pastry puffs became a little limp once out of the oven. For my second batch, I left them in for a couple of minutes longer and they held their shape better. My friend Jane suggested that I try puncturing them (a tiny pin hole) to let the steam escape once they are out and then popping them back in the oven (heat off) for a few minutes to crisp up. Will try that next time!

Filling
1/2 cup cream cheese, softened at room temperature
1 tbsp sour cream
2 tbsp chopped chives
1 tbsp chopped parsley
1/4 tsp garlic powder
salt and pepper to taste

Simply mix all the ingredients up!

I didn't follow Kat's instructions with regards to assembling the swans as my pastry was a little soft. She suggested using a very sharp knife to cut the top 1/3rd portion of the swan bodies off and then cutting that top 3rd in half, to get two "wings". The filling is then spooned onto the button 2/3rd portion. Next, place the head in the centre, through the cream and then lastly attach the wings on. (Don't worry, Kat included a couple of youtube links: click here and here

What I did? I used a sharp knife to split the top part of the pastry down vertically. I then filled the middle with the cream and attached the head in the centre. It looks alright, though not perfect. Next time, then!


Monday, April 30, 2012

Edamame, Broccoli and Cream Cheese Sandwich


Is edamame (young/green soy beans) really the secret of Victoria Beckham's enviably stick thin figure? Well, some years ago, the former Spice Girl revealed that her edamame-rich diet kept her slim. She let herself cheat on a single cupcake once in a while but mainly, she feasted on edamame, strawberries and lettuce. 

No, I am not about to go on the Posh diet quite yet but I must say she chose a delicious and extremely nutritious vegetable as her staple. Known as the "magic bean", edamame is rich in amino acids and is a protein source. It's also high in fibre, rich in vitamin C and folic acid and is known to lower your cholesterol. 

Most importantly, the young beans are delicious: nutty and sweet. I love edamame. The Japanese consume a lot of edamame: boiled and seasoned lightly with salt, the beans are a great accompaniment to beer or sake and a delicious appetizer before a meal of sushi.

It also makes for a delicious dip, a great base for vegetarian burger patties (keep and eye out for my next post) and a fantastic sandwich filling. 


Edamame forms the base of this sandwich filling.

Step one: Boil about a cup of beans for ten minutes or so. Remove the beans from their pods and roughly mashed them.  Season with salt, black pepper and finely chopped garlic. Next, mix in 3 tbsp of cream cheese and 1/4 cup grated carrots to the bean mash. What you get it is a thick spread. At this point, with a couple of drops of lemon juice, you could it  into a dip too but I'd suggest you try it in a sandwich first. I spread a thick layer of the bean mash (make sure you leave some half bean chunks in, for some bite) on the base of my sandwich.

That was step one. Oh, I forgot to mention, step zero is to get good bread. Good, sturdy bread that won't dissolve once you load it with filling. I used the Zucchini and Cheese Loaf I made yesterday.

Step two: The next step is adding texture to the sandwich. No one really likes a completely mushy sandwich, right? I like a little crunch too and so, instead of lettuce, I added roasted 1/2 cup of broccoli florets — just toss the broccoli florets in olive oil and roast them for about 15 to 20 minutes and season with salt and pepper — on top of the edamame spread. Have you tried roasted broccoli? It's really fantastic.


Next comes the cheese layer.


Grilled cheese sandwiches have a huge appeal for me. I toasted my bread and then added a generous layer of  mozzarella on the top slice of bread and popped it under the grill for a few minutes for it to melt.

At the same time, I toasted a few walnuts (you could use almonds or cashews), chopped them fine and sprinkled them over the broccoli.

When the cheese has melted, press the top layer over the sandwich and you're good to go!


Monday, January 23, 2012

Cream Cheese-Filled Buns


About six months into sixth form (this was some 20 plus years ago), I realised I'd made a huge mistake signing up for the Accounting paper. It was hard and I wasn't very good at it.  Furthermore, it wasn't a subject that was taught in school and so we (me and some of my fellow classmates) had to go for private tuition after school — two hours, once a week. Despite the tuition, I still sucked at the subject. Mistake. Big mistake as my results later confirmed. 

What's the point of this story?

Well, one of the highlights of the weekly tuition classes was the visit to the small bakery that was located almost directly beneath the tuition centre. Well, it was about four doors down. Every week, before, after or sometimes during class, we'd run down to the bakery to buy ourselves some treats. My favourite? A cream cheese bun that was soft, sweet and deliciously nourishing. I'd buy two. On the days the bakery ran out of the buns (they were hot items apparently), I'd be miserable all throughout class. More miserable than usual, that is.

For some reason, I thought of those buns today.


I am not sure if that tiny bakery is still in business or not but even if it was, I was certain it would be shut today, it being the first day of the lunar New Year and all. Damn the timing of these cravings!

Well, I decided to try and recreate the buns at home since I had plenty of flour and some cream cheese. I couldn't find a recipe online that fit the buns that I remembered and so I made do. I used a recipe for sweet buns and made my own cream cheese filling to stuff the buns with, crossing my fingers all the while (not while I kneaded but otherwise). 


The buns turned out great. In fact, they tasted quite close to the buns I'd had all those years ago. The only fault was in my execution of re-sealing the buns once I filled them with the cheese. I was remiss in making sure the buns were 100% sealed and as a result, some of the filling oozed out while the buns were baking.

Eeeks. No matter. A slight oversight. We live and learn, right? The buns came out of the oven an hour ago and so far, I've gobbled down two already. That's it. I have to do about 1,000 jumping jacks once I'm done with this post. Onto the recipe now...


Cream Cheese-filled Buns

For the buns
1/4 cup tepid water
21/4 tsp instant yeast
2 tbsp + 1 tsp sugar
4 cups all purpose flour
11/4 tsp salt
30g butter, softened
11/4 cups milk + 2 tbsp
1 egg


For the Cream Cheese Filling
100g cream cheese, softened
50g icing sugar
1 tsp vanilla extract


Dissolve the yeast and 1 tsp sugar in the 1/4 cup tepid water. Set aside till mixture becomes frothy.

Using your mixer (or by hand) beat the butter, salt and 2 tbsp sugar till light and fluffy. Add the 11/4 cups milk, egg and the yeast mixture and mix to incorporate. Add the flour (switch mixer to low speed if using) and mix to form a dough. 

Transfer to a lightly floured work surface and knead for about five minutes or till the dough is smooth and elastic (you can do the window pane test by pinching a small amount of dough and stretching it to form a pane. If it stretches easily without breaking, you're done).

Transfer dough into an oiled bowl. Cover with a clean dish cloth and let it rise for about an hour.

Make the filling. Beat the cream cheese, sugar and vanilla till light and fluffy. Chill for at least 30 mins. 

Preheat the oven to 200C.

When the dough has risen, lightly punch it down with your fingers to release the gas. Weigh (or estimate) about 40g dough and form small balls of dough, slightly bigger than a golf ball. 

Once the balls have been formed (you should get about 14-16), flatten each one gently with your fingers and fill them with a heaped tsp of the chilled cheese filling. Seal the buns by pulling together the sides and pressing them shut and re-roll them into balls. 

Place them about 2 cm apart on a baking tray (with an edge) and leave them to rise for about 20 mins. Cover with the dish cloth again. 

Brush the tops with the 2 tbsp milk. 

Bake for 20-25 mins. 

Monday, July 25, 2011

Cheesy Strawberry Cup Cakes


My husband thinks I am the world's biggest klutz. Whenever I trip over something (happens quite a bit) or topple a stack of baking trays (happens often enough) or slice my hand while cutting onions (happened just last month) he gives me "the look".

Tak lembut langsung  (not at all gentle/feminine) is what he says I am. A bull in a china shop!

Hmmmph.

So, I baked these strawberry cupcakes and iced them as delicately as I could to show him that I can too be sweet and gentle, even girly.

Of course, I didn't tell him how I had to make two batches of batter because while making the first batch, I accidentally knocked the mixing bowl over, sending half the batter and the strawberries mixed into the it flying.

Batter on the floor, the counter tops, the island, the sink, the fridge, the oven ... all of which was mopped up swiftly while he was playing his guitar upstairs.

But, what he doesn't know, right? (He doesn't read this blog).


So yeah, strawberries. I have been on a strawberry-binge lately. 

Last week I made some Strawberry Ricotta Yoghurt Scones. The strawberries that were baked into the scones were just so juicy, jammy, tasty and sweet, I couldn't help myself and went out and bought another tub of the stuff for these cupcakes.

The recipe for the cupcakes are simple which is important because this allows the strawberries to simply shine. The fruits also lend moisture to the cake so you get a really soft, most cake with tender, almost melting strawberries inside. 

The cream cheese frosting is optional but because it's really light (in texture as well as favour), it complement the cake well. I added some chopped up strawberries in the frosting too just to add some colour (the icing has lovely pink accents) and fruity sweetness to it. 

So, did the cupcakes change R's mind about my femininity (or the lack of)? Nope.

"It's really nice. Did you break anything?"


Strawberry Cupcakes with Strawberry Cream Cheese Frosting.

1 cup all purpose flour
3/4 cup castor sugar
11/2 tsp baking powder
pinch of salt
40g unsalted butter, softened
1/2 cup milk
1 egg
1 tsp vanilla extract
1 cup chopped strawberries.

Preheat the oven to 180C. Line a muffin/cupcake tray with liners. 

Mix the flour, salt, sugar, baking powder and butter on low speed until it becomes sandy or resembles fine breadcrumbs. 

Add the milk and vanilla and mix till well combined. Add the egg and make sure it well incorporated into the batter. 

Now with a spatula, fold in the strawberries.

Fill the cupcake liners till 2/3 full.

Bake for 20-25 min or till a tester comes out clean. Let the cupcakes cool in the pan for about 10 mins before placing them on a cake rack to let them cool some more. The cake will appear a little soft but will set while they cool.

Strawberry Cream Cheese Icing
2 cups icing sugar
40g unsalted butter, softened
110g cream cheese
5 strawberries, chopped small
1 tbsp milk

Mix the butter, cheese and sugar in an electric mixer till smooth and creamy. add the milk and then the strawberries. The paddle of the mixer will break the strawberries up but that's good because it makes the frosting look really pretty.

Cool in the fridge till the cakes are completely cook and ready to be iced. 


Sunday, July 3, 2011

Press One For A Cookie


I was about to end my love affair with cookies when I came across my mother's cookie kit which I stowed away in a trunk I have of "precious hand-me-downs" from my father, mother and grandmother. The trunk is truly a treasure trove as it has, among other things, my mother's old gold wedding sari (from 1964), my dad's model trains (he was obsessed with his train sets) and my grandmother's beautiful crocheted table linen. I decided to clean out the trunk (actually I wanted to see if there was any 'vintage' clothing I could salvage — I've been feeling the vintage vibe lately) and I came across an old, almost rusty biscuit tin tucked in a corner.

Ooooh. I was excited wondering what it could be. I squealed as soon as I opened the tin and spied the gold gleaming from underneath the lid. 

Not a necklace. Not a gold bar. It was my mum's old cookie press which I am quite sure is at least 40 years old. AMAZING. Why hadn't I looked for it earlier. I remember as a child of seven or eight, I'd watch as my mum made cookies using her press for our teatime treats. I used to badger her to let me try my hand at the press but she always kindly refused, allowing me to help fill it with the cookie dough instead. 


Wow. This find was huge. 

I abandoned my search for vintage wear, packed up the trunk and ran downstairs with the tin. My dog Mojo looked up, irritated at the noise I was making while he was trying to nap, I presume.

I told him of my plan to bake some more cookies and he seemed satisfied and went back to sleep. 

I carefully took the cookie press — the brand was Sawa Deluxe 71 — out of the tin and inspected the condition of the gadget. It hadn't been used for at least ten years, I am sure and I hoped it was still functional.


Turns out, it was more than just functional. It was in mint condition. Old is gold.

The cookie press comes in four parts: a gold metal tube that holds the dough; a screw-on ring to hold the shape-discs, the plunger and lever that push the dough out through the discs. The tube still gleamed, the discs (that come in various cut-out patterns to determine the shape of the cookies) were also perfect. I tried the lever on top that pressed the dough out through the discs and it was good to go too. Fantastic. All it needed was a good wash.


I then began my search for a suitable recipe so that I could use my press immediately. Cookie press dough needs to be a little softer so that the dough can pass through the holes in the discs.

I settled on a recipe for Cream Cheese Cookies mostly because I had about 100g of cream cheese that had been sitting in my chiller for about a month.

Using the cookie press proved to be a challenge for me ... in the beginning. The problem was my dough: it was a little too soft. After I added a couple of tablespoons of flour though, it became firmer and the problem was solved.

I also had to get into the grove of using the press. There was a "switch" just beneath the lever that could adjust the thickness of the dough that comes out. My first few attempts yielded really skinny and thin cookies. I was so frustrated. Then I decided to do some research (as the manual for the press was missing) and I went online to look for a solution which is when I discovered the "switch".

Once that was settled, I was unstoppable. So excited was I that I took out my sugar sprinkles and went crazy on my cookies.

The Cream Cheese Cookies were tasty. It is a soft cookie, so don't hope for a crunch.


Cream Cheese Cookies
225g unsalted butter, softened
100g cream cheese
1 cup Castor sugar
1 tsp vanilla extract
1 egg yolk
1 tsp lemon zest
21/2 cup all purpose flour, sifted
1/2 tsp salt

Preheat the oven to 180C. Cream the butter and cream cheese in the electric mixer (paddle attachment) until soft. Add the sugar and mix till light and fluffy. Add the vanilla extract and egg yolk and mix till well incorporated. Add the zest and a couple of seconds later, the sifted flour and salt. Mix on low speed till evenly combined. The dough should resemble play-dough. If it's too soft, add a couple of tablespoons flour into the dough by hand.

Get the cookie press ready. 


Screw on the rod/lever to the tube. 

Take a portion of the dough and roughly shape it into a log and fit it into the tube from the bottom of the tube. 

Choose a disc with a cut out pattern that you like and then place it on the bottom ring. Screw the ring on to the bottom of the tube. 

Place the cookie press down on a flat surface and pump the lever a few times to push the dough to the bottom of the press. You should hear a loud clicking sound as so do this. You  should be able to feel when the rod touches the dough indicating that the dough has reached the bottom and is ready to be pressed.

Have a trial run. Keeping the press flat on a baking tray (ungreased). Push the lever down once to push the dough through the disc. Lift the press straight up and you will be able to see the shaped cookie on the tray. Leave a 2cm gap between each cookie and repeat.


Bake the cookies for about 10 mins. You can decorate them with sprinkles or chopped cherries before you bake them or leave them plain. 


Saturday, March 5, 2011

Icing on the cake


I think I'm about ten years behind the times.

The world went crazy for cupcakes about a decade ago after Carrie (Bradshaw, of course) and her middle-aged friends from Sex in the City made cupcakes from New York's Magnolia Bakery look like the best indulgence one could ever have.

Today, I made cupcakes. It wasn't my first time; it was my third. Ever. Not for any particular reason, really. I just always preferred to make one whole hearty cake than many small, dainty ones.

You see, I'm not at all dainty. Some people call me a giant and I call myself clumsy. Now you understand, right?


So anyways.

The real star of this post is not the cupcake; it's the icing. When I saw a recipe for mascarpone-cream cheese frosting, I was floored ... slipped on my own drool and went tumbling to the floor. Ha!

I am kidding, of course... but dang, the frosting sounded divine.

Now mascarpone cheese is very pricey. Usually, the price of a 250g tub of mascarpone is about RM23. Last week however, I spotted a 250g tub for just RM11.50. Still expensive but, heck, it was a steal and I just had to buy it, even though I hadn't a recipe for it in mind. Yet.

Now if ever there was a "luxury cheese" it would be mascarpone. Italian, of course, mascarpone is cow's milk cheese that has a milk fat content of about 60 to 75%. It's buttery, creamy and very rich. Have a spoonful and I guarantee you will find it literally coats your mouth.

You most commonly find mascarpone in Tiramisu but honestly, many Italian recipes incorporate mascarpone to give a richer, creamier flavour. You can find it in risotto to lasagna and of course, cannollis. Some even add a small spoonful into their hot cocoa.


So I decided to use it in this icing. I love cream cheese icing too. But cream cheese is a little dense. Adding some mascarpone and sour cream (optional) makes the icing a lot creamier but also a lot lighter. It also made it a lot richer. (Oh! my hips!).IT isn't overwhelmingly sweet as you want the flavour cheese to stand out and not the sweetness of the sugar!

Here's the recipe for the frosting: The original cake for this icing was a brown butter cupcake but I decided to go with a simple lemon cupcake simply because I love lemons. I haven't included the recipe for the cake and  I suggest you make your cake of choice.

Mascarpone-Cream Cheese Frosting
(enuogh frosting  for 12 cupcakes).

250 gm mascarpone cheese, room temperature

1 cup sour cream (optional)

125gm cream cheese, room temperature

1/2 cup icing sugar, sifted

Beat the mascarpone cheese and cream cheese (make sure they're at room temp) into the bowl of your  electric mixer (medium speed) till smooth. Add in the icing sugar.
Add the sour cream and beat until everything is well incorporated, just a minute or so. You will see  soft peaks beginning to appear and that's just the right time to turn the mixer off.

Transfer the frosting into a piping bag and  pipe on top of cupcakes or use an spatula to slather the  frosting on your cupcakes.

Monday, February 22, 2010

Small wonder


The heat in Kuala Lumpur has truly been unbearable the last week or so. All I want to do is sit in front of my TV with the air conditioner and fan both on full blast and vegetate.

But, tomorrow is Monday and I brought home some work to do over the weekend ... work I have to "hand in" tomorrow. Gosh,  sometimes it feels like I'm still in school! Needless to say, I haven't done anything. I guess, I'd better get on it.

So, what do I do? Bake. Well, it's cool in the kitchen and I need some inspiration to actually get down to work. Ok, that didn't sound too convincing did it? No matter. At least, I can bring my baked goodies to work and bribe my way out of a shelling (don't judge me.. ;0).

So, onto the dessert on hand. A cream cheese poppy seed cake sounded really good. I had some cream cheese in the fridge and poppy seeds are always aplenty in my pantry so I was set. Perhaps this was meant to be...

The recipe is courtesy of Martha Stewart, though  I altered the presentation of it a little. Martha spreads the creamed cream cheese on top of the cake batter, kind of as a topping to her cakes. I decided to include a layer in between as well, making it a layered cream cheese cake.


What you need is:


1 cup unsalted butter, and a little more for greasing your muffin pan


1.5 cups cake flour, plus  a little more for dusting the muffin pan 1/2 tsp salt


1.5 cups caster sugar


3 large eggs + 2 yolks


1.5 tsp vanilla extract


3/4 cup whipped cream cheese, room temperature


3 tbsp icing sugar


1 tsp poppy seeds .


Preheat the oven to 160C.


Whisk the Flour and salt and set it aside. Cream the butter and sugar till light and fluffy. Add in the eggs and yolks, one at a time and then the vanilla extract and 1.5 tsp water and continue to mix till well combined.


Add the flour and salt mixture gradually and mix till its all combined into a thick-ish batter.


Grease a 12-hole muffin pan with butter and dust with flour. Spoon the batter onto  the muffin pan till each mould is a quarter full.


Now, put the cream cheese and icing sugar in the bowl of your mixer and mix on low speed till creamy.


Spread a layer of cream on top of the batter.


Spoon another layer of batter till 3/4 full and then spread another layer of the cream cheese on top.


Sprinkle each cake with poppy seed. Bake for 30 mins or till tester comes out clean.

Related Posts with Thumbnails