Showing posts with label Chocolate. Show all posts

Saturday, September 13, 2014

The show-stopping Dobos Torte


I always believe that if you're going to make a comeback, it better be good. I'm embarrassed to say that I've been away from this blog for more than two months. And before that, my posts have been sporadic to say the least. 

I'm not going to list down my excuses for being absent - nobody really wants to read about excuses. But I've found a perfect cake to bounce back on - the Dobos Torte, a Hungarian seven-layer sponge cake, with chocolate buttercream and a caramel layer on top. 

Doesn't that sound divine. Sponge, chocolate, caramel. Layers and layers of sponge, chocolate and finally ... caramel.

Being a TV freak, it isn't surprising that the idea to try this cake came from a TV show - the Great British Bake Off (season 5, ep 6). As soon as the show ended, I went online and started reading up about this decadent cake and bookmarked two sites: Joe Pastry and Smitten Kitchen. 

A traditional Dobos Torte is round and has seven layers but I kinda liked the non-traditional rectangular cake made by Smitten Kitchen and I added a couple more layers. So it's a derivation from the classic (of which there are apparently over 100 variations), but the flavours are the same. Well, kinda. The chocolate buttercream is more of a ganache but heck, it's delicious so I'm certainly not complaining.


I was psyched. I read through both recipes and checked to see if I had all the ingredients - apart from the standard flour, sugar (confectioner's sugar), vanilla extract, chocolate and butter, you will also need eggs. A lot of eggs. About 13. 

Check, I had them all.

I decided to start it on a Saturday morning, bright and early because this cake takes at least three hours to make, from start (assembling the ingredients) to finish (frosting the cake and photographing it).

In all honesty, it's not a complicated cake to make but it takes time, some patience, attention to detail and ... did I say patience already? But the recipes on both Joe Pastry and Smitten Kitchen are fabulously precise and clear which made it a lot easier.

But let me warn you, there's an awful lot of washing up to do. 


That's only half the equipment you'll use. 

But, do try it. No, seriously. Try making it and then try eating it. And then try stopping yourself from eating it all at one go because it tastes even better the next day, all chilled.

I'm not going to include the recipe in this post as you'll get a better idea of the process on Smitten Kitchen's website (she has gorgeous photos of the process - I was too stressed to stop and photograph each step. Heck I didn't even know if it'd turn out) but I will point out a few of details/technicalities you will have to be prepared for.

Not to scare you from making it or anything, just to prepare you.

1. There are lots of eggs to separate. About 13. And you will be left with 3 egg whites to use elsewhere. I made an egg-white omelette and felt really healthy (even after two large slices of the torte).

2. You will have to bake seven layers of thin sponge, each for about 6-7 minutes (which means you really can't leave the kitchen for about an hour). Achieving almost the same thickness for all seven layers was the hardest part about making this cake - you can weight each portion but I just winged it and it turned out pretty fine, although my sponges were a little thin - perhaps I should have stuck to seven layers. Next time. 

3. You will have to clear some kitchen space as you will need to lay each layer out to cool before even thinking of assembling the cake. I inadvertently cleaned my kitchen in the process, so I guess it was a bonus.

That's about it really. The rest are pretty standard baking protocols.


Sunday, November 3, 2013

Decadent: Chocolate Buttermilk Cake


Oh! For the love of chocolate.

Sometimes it pays to be a little lazy. This Chocolate Buttermilk Cake, a Tish Boyle creation, called for shredded chocolate inside the chocolate batter. Shred? Oh that sounded like too much work, particularly since I was baking this at 10pm on the eve of Deepavali, the festival of lights celebrated by Hindus the world over. Yes, I kept my baking to the very last minute and I had one day to make 6 desserts. Yes, I am silly that way.

So, shred the chocolate? I resorted to "roughly chopping" instead and ended up with uneven chunks of dark chocolate. Doesn't matter, I thought - it'd melt in the batter as it bakes anyway. Right?

Well, they didn't completely melt away in the batter which was .... PERFECT. Apart from the rich, chocolate flavour of the cake (for Tish's recipe is really solid), there are chunks (oh! thank goodness for my laziness) of chocolate within the cake. In every bite, literally, you bite into soft, almost melted chocolate that's sandwiched in the tender and moist crumb of the cake.

Oh, and I must admit: I increased the quantity of the chocolate too. :) I just couldn't help myself.

Really. You need to try being lazy. This cake turned out better than I could have hoped for. It is super, duper chocolatey. I mean, really. Super duper.


I can't take credit though.

Just like all her other cakes which I've tried (her pound cake is great too), Tish Boyle's Buttermilk Chocolate Cake is a winner. Using buttermilk almost guarantees a very soft and almost creamy texture which - to use a cliche - melts in the mouth.

Tish's recipe is for individual cakes baked in mini bundt pans. I didn't have mini bundt pans plus I really wanted to make a whole cake. I baked mine in an 8-inch round tin and had to extend the baking time by about 10 mins so that the center was cooked through.

The cake doesn't need icing. I just decorated it with some powdered sugar which I dusted through my brand new stencil - isn't it pretty? It's not a terribly sweet cake either which means you can eat more than a piece with a little less guilt :)


Monday, June 10, 2013

Tarts, tarts, tarts


For our monthly Don't Call Me Chef column which is published in Star2 today, we decided to derive inspiration from nursery rhymes. My nursery rhyme of choice was The Queen Of Hearts rhyme made popular by Lewis Carroll's Alice in Wonderland. 

The Queen of Tarts she made some tarts
All on a summer day
The Knave of Hearts, he stole those tarts
And took them quite away

I like this rhyme but more than that, I love tarts. It's my go-to party dish at the moment. For dinner, tea or breakfast/brunch, I'm surely gonna make you a tart should you come by my way.

For the column, I made a Dark Chocolate Rum Tart inspired by master baker Dan Lepard's Pecan Crust Bourbon Chocolate Tart which you can view in his post in The Guardian some time back. 


Let me tell you: it was delicious! Decadent! You won't be able to stop at one. You may not want to share it with your guests! 

I made a few minor adjustments: he uses bourbon, I used rum; he uses cane sugar I used palm sugar and I also added some sea salt into the chocolate. I also made a chocolate-walnut crust (adding more cocoa than Lepard uses) instead of a pecan crust. 

You can check out the recipe for the Chocolate tart I made here.

Yesterday I made another tart: a Lemon Mascarpone Tart with a Rosemary crust and sour cream topping. 


Like most lemon tarts/slices, this one is tangy and very lemony. It's also creamy because of the mascarpone. The sour cream topping helps soften the tartness of the lemon filing - especially if you're not a huge fan of lemons. 

The filling is not cooked and thickened to form a curd. Though slightly runny, the cheese helps it set quite quickly. 

The recipe was inspired by one I saw in the food section of The Telegraph's site. I added the rosemary (because at the moment, rosemary and lemon is my favourite couple) and the sour cream.

The tart is best eaten chilled.


Lemon Mascarpone Tart with Rosemary Crust

For the pastry
100g plain flour
50g icing sugar
70g ice cold butter, cubed
1 sprig rosemary, chopped fine
pinch of salt 
4-6 tbsp ice cold water/milk

Filling
2 eggs
2 egg yolks
juice and zest of 2 lemons
125g mascarpone cheese
100g castor sugar
3 tbsp sour cream

First the pastry. Whisk the flour, salt and rosemary together. Add the cold butter and with your fingers or a mixer, rub the butter into the flour until you end up with a mixture that resembles breadcrumbs. Add the cold water a little at a time and work quickly to form a dough. Shape into a disc, wrap in cling film and chill for at least 30 mins.

Once chilled, roll the pastry on a floured surface until about 2mm thick. Lift the pastry carefully and fit into tart tin (I used an 8-inch tin). Prick the bottom and sides of pastry with a fork and blind bake in a 180C oven for about 12-15 mins or until the base has hardened slightly. 

Remove. 

For the filling, beat the eggs and sugar until the mixture gets pale and creamy. Add the mascarpone and the lemon juice and zest and mix to incorporate all ingredients together.

Pour the filling into the half-baked crust and put it back in the oven for about 20 minutes or until the filling is set.

Remove from oven and let cool. Once cool. spread a thin layer of sour cream on top.


Sunday, May 12, 2013

Mother's Day Marble Cake


Dearest Mummy

It's mother's day today and though we never really celebrated Mother's Day with much fan fare, I  am thinking of you today. A lot.

I suddenly had a craving for your marble cake last night ... you know, the one you used to make for tea when we were children? I don't think I ever told you how much I loved that marble cake. It's a shame I never asked you for your recipe - heaven knows I've tried many different recipes from sites I've found online. Some were good (some were even really good) but none have been quite as good as the one you used to make. The marble cake that is sold at our canteen at work is pretty good, actually. But your cake, mummy, was not just pretty good. It was fabulous.

So anyway, seeing that it is Mother's Day and all, I decided to give in to my craving. I looked up the one recipe that came close to the taste and texture of the cake you made. It's from a blog called Chocolate & Zucchini, a blog I visit quite often. Yes, mum. You'd be surprised at how much I cook these days (considering you had to nag me to help you before!). I guess I've grown up somewhat!


Anyway, Clotilde of Chocolate & Zucchini uses melted chocolate in her recipe instead of cocoa powder like you used to. She also uses cocoa nibs in between the layers of plain and chocolate batter.  I usually mix a little bit of cocoa powder and some brewed coffee into the melted chocolate to add some kick into the chocolate batter. But I ran out of both cocoa and coffee and so I too just used melted chocolate. Yes, mum, I know you're rolling your eyes. Yes, I still don't make a list before I go shopping and find myself running back and forth to get ingredients I've forgotten. Some things, I guess, haven't changed!.

I also added sour cream to the batter instead of milk. Clotilde suggests yoghurt or buttermilk but I really love how sour cream adds so much moisture and also a very subtle flavour to cakes. I wonder if you ever tried it in your cakes ...


The cake turned up fabulous, mummy. For once, I actually allowed my cake to rest and cool down completely before cutting it and trying a piece. Usually, I can't wait to try a piece and end up cutting my cakes while they are still warm-ish causing the cake to crumble a little. Yes, yes, I am still a little impatient. OK, a lot impatient. You remember how I used to peer in the oven to see if your cookies and cakes were ready? Or how I used to linger in the kitchen when you were making my favourite dishes?

I also followed Clotilde's suggestion of drizzling a syrup on the warm cake as soon as it's out of the oven. She added a cacao liqueur/rum in her syrup. I used my favourite cream liqueur, Amarula, in my syrup. Oh, mum. You would have liked it too, I think. Remember New Year's Eve in 2004 when we had some wine that Sree brought over? You were a little tipsy, weren't you?


So, yeah, the cake was yum. I served it for breakfast and R loved it (I pitied him because he never had the chance to eat your cake! Unlucky fella!). It was a nice way to start the day mum, we spoke about you and shared some laughs (well, you were quite funny!). I couldn't share the cake with Mojo though. Too bad dogs can't eat chocolate. He would have loved the cake too seeing that he loves anything you feed him anyway. Yes, he is terribly spoilt.

I've got to head out for lunch now but before I do, Happy Mother's Day to the most wonderful mother ever. I miss you a lot. Till our next chat! xoxo.

Marble Cake
(Adapted from Chocolate & Zucchini)
For the cake
100g dark chocolate, chopped roughly
4 eggs
250g sugar
120ml sour cream
220g flour
2 tsp baking powder
1/2 tsp salt
120g butter, melted and cooled
1 tsp vanilla extract

Preheat the oven to 170C.

Melt the dark chocolate in a bowl over simmering water. Set aside to cool.

Whisk the flour, baking powder and salt together.

Beat the eggs and sugar until incorporated. Add the sour cream and beat to mix. Add the flour and butter, alternating between the two.

Separate the batter into two bowls: 2/3 in one bowl and 1/3 in another.  Add the vanilla extract into the bowl with more batter. Combine the smaller batch of batter with the melted chocolate and stir to combine.

Line and grease a loaf pan. Pour in the batter: first, add 1/3 of the vanilla. Next, add half the chocolate batter on top of the vanilla (you don't really have to spread it or swirl it). Add another 1/3 of the vanilla batter and then, the rest of the chocolate. Top the cake with the remaining vanilla batter.

Bake for 50-60 mins or till a tester comes out clean.

For the syrup
1/4 cup water
3 tbsp sugar
2 tbsp Amarula

Heat the water and sugar until the sugar dissolves and the syrup thickens. Stir in the Amarula and let it cool.

Drizzle the syrup over the cake once out of the oven. Cool.


Wednesday, December 26, 2012

Chocolate Covered Red Velvet Balls


These chocolate-coated red velvet cake balls (what a mouthful!) were the result of a kitchen accident. Honestly. I know cake pops (cakes that are crumbled, rolled into balls, impaled on lollipop sticks and coated in chocolate or candy) are all the rage,  but  personally I don't see the allure of eating cake on a stick. I mean ... won't it be messy? What if, after one bite, the whole ball of cake crumbles, falls off the stick and unto my lap? Embarrassing.

Thing is, that's quite likely to happen to me. I have  earned  quite a reputation for being a klutz. Just last week, I was eating at a restaurant with my husband and a couple of friends and I dropped my knife three times. Three times. I don't know how it happened (my husband has some theories, particularly about how careless I am) but I was so embarrassed, I ended up cutting through my meal with just my fork. 

And then there is the accident with this cake. 

I baked a two-layer red velvet cake for my sister in law last Saturday. The cake turned out well and my frosting work on the cake actually looked pretty decent. I added some sugar hearts on the cake and was about to put it in the fridge to chill. 

So, picture this: I had the cake in one hand and was walking towards the fridge -- just three steps and I would have made it too except I saw a stray heart that had fallen off the cake onto the floor. I decided to bend down and pick the heart up to thrash while still holding on to the cake in one hand.

Mistake? Hell yes! The next thing I knew, the top layer of the cake was on the floor. Splat! All over the flour and over my feet. 

I wept. My husband laughed. Bah. 

Long story short, I cleaned up the mess and transferred what was left of the cake (the bottom half and most of the frosting) into a container to go in the fridge. I then proceeded to make another cake for my sister in law. I was more careful this time and didn' t try to multitask. 

Yesterday, I took out the salvaged cake that was in the fridge to make cake balls.


Cake balls are quite different from cake pops. They may not be as charming as the pops (who isn't tickled by a lollipop cake?) but they are definitely sturdier -- you hold them securely as you bite into them. No chance of anything falling.

Taste-wise, these cake pops are amazing. The slightly bitter dark chocolate coating complements the sweet, rich and creamy cake (imagine the red velvet cake and the icing mixed into one moist ball of heaven) so well.

Texturally, the crunch of the chocolate that has set and is chilled contrasts against the moist and soft cake.

Visually, it's even more stunning. Imagine the dark chocolate against the deep red which is streaked with the white from the cream. Beautiful.

 I certainly don't recommend that anyone destroy a cake on purpose to make these balls but they'd be the perfect solution for leftover cake.


There isn't a recipe for this post but I have some tips on making cake balls. If you want to make this red velvet cake, check out my older post here.

* It only works with cakes that have some kind of icing or ganache as the icing/ganache serves as a binder. The cake should be slightly sticky. 

* The mashed cake has to be chilled before they are rolled. Once rolled, they have to be chilled again (at least 30 mins) before coating. This will keep the balls together. Once coated, they must be chilled again for the chocolate to set.

* For the coating, add some fat (butter/shortening) in with the chocolate when you melt it so the consistency is thin enough to coat the balls nicely. Mine was a little thick and therefore not satiny smooth. The butter also makes the chocolate coating shiny. I melt my chocolate on a double boiler (placing a bowl over a pan of boiling water, making sure the bowl doesn't touch the water) but a microwave would work as well. 

* Before coating, line a baking sheet with parchment paper. Place the coated balls on the paper: they will come of easier without the chocolate breaking. 

* Speciality bake shops sell cake pop pans or moulds but seriously, you don't need them. It's ridiculously easy to roll the balls yourself. Just make sure you have enough icing to bind the cake together but not too much that the cake becomes too soggy. Add the icing in gradually and test the consistency. 

* If you want to sprinkle coloured sugar crystals (or any other fancy cake decorations) on the chocolate, do it before it has set. 

Postscript: the popularity of cake pops seem to go bake to Bakerella otherwise known as Angie Dudley, a blogger from Atlanta in the United States. If you are a fan of desserts, particularly novelty desserts that look as pretty as they are good to eat, check out her site bakerella.com.  Amazing stuff!

Friday, October 5, 2012

Kek Batik (Revised)


In Australia, this desserts (or a variation of it) is called a hedgehog. In Malaysia, we fondly refer to it as Kek Batik. Essentially, both are frozen no-bake desserts that combine melted chocolate with biscuit pieces/crumbs. They are insanely easy to make (honest to goodness, folks) and they are even easier to gobble.

Home cooks often put their own spin on recipes, as I discovered when I asked a few friends about how they made this delicious dessert. (Though I grew up eating Kek Batik in friend's houses, I'd never made it until very recently and so I had to do some research).

The common ingredients are chocolate and biscuits, the type of chocolate and biscuits used different considerable. Some cooks use cooking chocolate, others use cocoa and some others use Milo. As for the biscuits, most used the modest Marie biscuit (available at almost every grocery or sundry shop) while some used oat biscuits or ginger snaps. Oooooh.

Some cooks use condensed milk to help bind the ingredients together. Some use a single egg. Some use both.

I was a little lost at first but then I decided to stick to the staples: dark chocolate and Marie biscuits and experiment with the rest.


I decided not to add condensed milk. It's toooooo sweet and I am on a diet goddammit! I included the egg. If your alarm bells are ringing — adding an egg in a no-bake dessert??? — rest assured, the egg is added to the chocolate as soon as it is melted over a double boiler with some butter. The chocolate-butter mixture is hot and the raw egg should be mixed quickly into it to avoid scrambling.

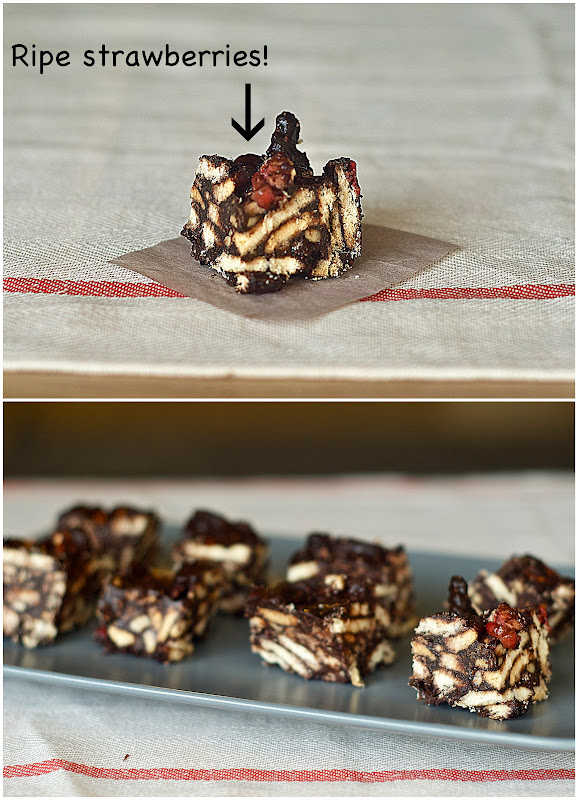
I also decided to add some nuts (roasted cashews, unsalted) and also fruit (strawberries) instead of added sugar into my dessert.

Guess what? It was amazing. The tiny bits of strawberry and the nuts added texture and depth to an already tasty treat. And the pink bits of strawberries peeking through was just so pretty.


Kek Batik (Revised)

400g dark cooking chocolate, cut roughly into pieces
200g butter
200g Marie biscuits
1 cup chopped roasted cashews
1/2 cup strawberries, cut up into tiny pieces
1 egg

1 square/rectangular baking dish

Melt the chocolate and butter in a bowl over a pot of boiling water. Once both are melted and combined, take it off the heat (it should be nice and shiny) and quickly stir in the egg. 

Break up the biscuits and mix in the nuts and berries in a bowl. Pour the chocolate mixture over the biscuits and mix to combine well.

Transfer the mixture into a square/rectangular baking dish and press down hard. Refrigerate or freeze to set. 


Monday, July 30, 2012

Dark Chocolate Mousse Tart


Intense. That's one word that perfectly describes this dark chocolate mousse tart. Intense colour, intense flavour and intensely ... satisfying too. If you've visited this blog lately, you'll know full well how I've been consumed with making pastry off late. Pies, tarts, puffs ... that's about all I've been making for the last couple of weeks. And so, when I watched Mindy, a contestant on Masterchef Australia (season 4) make a chocolate mousse tart with a chocolate shortcrust pastry shell, I knew I had to give it a go. A chocolate crust: wow! (Mindy went on to win the challenge and her tart was featured on the cover of the Masterchef magazine — didn't know there was such a mag. But you can check it our here). 


So anyway, I decided to follow her recipe for two reasons: first, it looked bloody good — chocolate on chocolate? I mean who can resist, right? Second, while I love watching episodes of Masterchef (the Australian one, not the American version),  I am always curious about how good the dishes really are. I mean, the ones that the judges rave on about. The abilities of the home cooks are without a doubt gasp-worthy but I just wonder how the dishes actually taste. So, by trying out Mindy's recipe, I'd be able to satisfy my curiosity.  


I followed her recipe with minimal changes: she poured a caramel orange syrup over her tart, I chose to drizzle a spiced orange syrup instead. Also, she used 3 egg yolks on top of 2 whole eggs, I just used 2 yolks as I had just four eggs left at home.

The instructions in Mindy's recipe were easy enough to follow. The crust used a fair amount of cocoa powder which was combined with flour, icing sugar and ground almonds. It's a shortcrust pastry: chilled butter is rubbed into the dry ingredients and then a liquid (in this case an egg) is added to bind the dough together. The pastry was rich and very chocolaty. It was also a little more wet than your regular shortcrust shell. I liked the taste: it wasn't too sweet ... in fact it wasn't sweet at all, allowing the chocolate to be the star ingredient and flavour. I might try using ground hazelnuts instead of almonds the next time as I think hazelnuts go so well with chocolate. (I did try using hazelnuts and it was brilliant. I think I'd go with hazelnuts in future. It also combines well with the cocoa and flour and you don't see specks of beige as with the almonds). But, yeah it turned out to be a really nice crust.


The end product was a deeply satisfying chocolate treat. Rich, warm and comforting and "super yum", as the judges on the show eloquently described it. Super yum indeed.

Chocolate Mousse Tart
(Adapted from Mindy Woods recipe from Masterchef)

For the pastry
100g plain flour
70g cocoa powder
pinch of salt
60g icing sugar
20g ground almonds
90g butter, chilled and cubed
1 egg


For the mousse
275g dark chocolate
140g butter
2 eggs
2 egg yolks (the original had 3 egg yolks)
110g castor sugar
zest of one orange

Orange syrup (not from the original recipe)
3 tbsp castor sugar
3 tbsp orange juice
1 tbsp orange zest
3 tbsp water
1 star anise

For the pastry, whisk the flour, sugar, ground almond and cocoa together in a bowl. Add the cold butter and rub into the flour mixture with fingertips until you get what resembles coarse breadcrumbs. Add the egg and bring the crumbs together to form a dough. It will be slightly (just slightly) wet. Shape into a disc and chill for at least 30 mins.

Once chilled, place the disc in between two sheets of non grease paper and roll till about 4 mm thick. transfer onto the tart pan (10-inch) and gently mould to fit the pan.

Prick the base of the pastry case with a fork and chill for 15 mins. Meanwhile preheat the oven to 180C. Pre-bake the crust for 15 mins, until the base of the pastry has dried and hardened a little.

For the filling, add he chocolate and butter in a bowl and place the bowl above a pot of simmering water. Stir until both the butter and chocolate melts and becomes a shiny ganache. Remove and let cool.

Turn the heat off the water but keep the pan on the stove. Add the eggs, yolks and sugar in a bowl and place the bowl above the steaming water. Whisk with an electric hand held mixer or a balloon whisk till the mixture almost tripled in volume and you can form ribbons with the mixture. Stir in the zest.

Add to the cooled chocolate ganache (in three installments) and fold in gently.

Pour the filling into the pre-baked crust and bake for 18 mins. Remove and cool.

Make the syrup: add all the ingredients in a saucepan and heat until sugar dissolves and the syrup thickens. Drizzle over tart.

Saturday, June 16, 2012

Chocolate Cake For Dad


It's Fathers Day tomorrow and I baked this Dark Chocolate Cake for my daddy. Truth be told, I don't really know if he'd like this dessert. Actually, I don't know what his favourite dessert was. I faintly remember him liking dark chocolate but I don't recall him being a huge fan of desserts. I asked my brother and my sister what they remember and they say that though he liked dark chocolate, his favourite dessert was probably kesari, an Indian dessert made with semolina and nuts and raisins. 

Bummer. Sorry, dad. I don't know how to make that one. 

Dad and Mum on their wedding day


My dad passed away when I was 10. I have a few memories of him — I really wish I could remember more but the ones I have, I cherish dearly. I remember how he loved music. He really loved classical music (he had a huge record collection which I still treasure) as well as pop numbers of his time: Neil Sedaka, Perry Como, Pat Benatar...many more.

He also loved model trains and he had a model rail transport system set up in a room at the back of our house. He'd order the material(scale models of locomotives, streetcars, tracks, signalling, buildings, vehicles, model figures of people, streams, hills, canyons and carpet grass)from the UK and he would spend hours assembling, painting, wiring the different components to create a complete system. They were awesome and I still have all the pieces, though they're not assembled anymore. 


He was also a terrific father: I was his favourite, being the youngest I guess, and so he rarely (if ever) scolded me.In fact, he often indulged my spoilt ways: he'd eat the food off my plate (the bits I hated), for example. The only time he'd get angry was when he saw my less than stellar performance in school. Still, he wouldn't scold me. He'd be annoyed but he'd tell my mother to coach me more after school.

He was also very sociable and loved to dance. He was also quite messy and much to my mother's(and husband's) frustration, I inherited this trait.

I don't think we celebrated Fathers Day much when we were growing up — I don't think it was such a commercial celebration at the time. But we ate dinner together as a family every night and sometimes we'd go out for meals. 

But this year, on the 30th anniversary of my dad's passing, I wanted to bake him a cake. It has dark chocolate, golden syrup, cocoa and eggs. No flour and no sugar. And, it has AUBERGINES. Yeah, BRINJAL.  

One of dad's model train engines, still in mint condition.
This is a cake inspired by Harry Eastwick's Heartache Chocolate Cake which my good friend Jane of The Wayward Oven made some time back. I've been wanting to try it for some time now and this seemed as good a time as any. I've used vegetables in cakes before but I was intrigued at her use of brinjal in a cake. The vegetable added a delicious moistness to the cake which I love. This is a chocolate-rich cake and it isn't terribly sweet. 

I made just a few adjustments to suit my taste: I replaced the honey in the recipe with golden syrup as I don't enjoy the flavour of honey. I also added some mint (chopped fresh applemint). Since I don't have a microwave oven to soften the brinjal, I used Jane's suggestion of softening it on the stove in a saucepan with a little water. For Eastwick's recipe, check out Jane's entry. 


Dark Moist Chocolate Cake 
(adapted from Harry Eastwick's Heartache Chocolate Cake)

400g brinjal (about 2 large ones)
300g dark chocolate (I used one with 75% cocoa), broken.
50gm cocoa
60g ground almonds
180g golden syrup (the original recipe called for 200g clear honey)
3 eggs
2 tsp baking powder
1/2 tsp salt
1 tbsp chopped mint leaves (not in the original)
2 tbsp Guinness (the original recipe called for brandy)
icing sugar for dusting

Peel the brinjal and roughly dice them. Place them in a saucepan with about 4 tbsp water and heat them (low heat) until they soften. Closing the saucepan will speed up the process. Once they're soft, drain the liquid and put them in a blender and puree them. Then add them to the chocolate in a bowl. Cover with cling film and allow the hot brinjals to melt the chocolate. 

Meanwhile add all the remaining ingredients in a large bowl and whisk them together well until all the ingredients are well incorporated. Add the melted chocolate and brinjal and stir well to mix everything together.

Pour the batter into a lined baking tin and bake in a preheated oven (180C) for about 35 mins or until a tester comes out clean.

Saturday, January 7, 2012

Chocolate Cake with Nutella Cream Cheese Frosting


Do you have a favourite chocolate cake? I don't. Well, not particularly. I like chocolate cakes that are really, really chocolaty and very, very moist. As long as these two requirements are met, I'm not fussy. 

And usually, I like my chocolate cake with a purely chocolate ganache or frosting. Nothing fancy. Nothing too experimental. But, when I came across a recipe for a Nutella Cream frosting, I was tempted. I was even tempted to add Nutella inside my cupcakes but I chickened out at the last minute and added chocolate chunks inside instead. 


See how dark the cake is? Rich! Chocolaty! Moist! Yay.

The method for making this cake is real simple — it's a one-bowl cake that's perfect for slacker Sundays. What the heck is a one-bowl cake? It means you simply mix all the ingredients in one bowl at one go (almost) and voila, you're done. No need to cream the butter and sugar first. No need to melt any chocolate. A real time saver with guaranteed results.

That's the cake. The frosting? Just as easy. Also one-bowl ... one mixer bowl, that is. Unless you feel like hand whisking. 

The result? The cake was nice and chocolaty and the frosting? If you like Nutella, you'll love it. Me? I like it but I'd revert to pure chocolate frosting next time. I'm just boring that way.

One-Bowl Chocolate Cupcakes
3/4 cup cocoa
11/2 cups all purpose flour
11/4 cup sugar
3/4 tsp baking powder
11/2 tsp baking soda
3/4 tsp salt
2 eggs
3/4 cup warm water
3/4 cup buttermilk
3 tbsp vegetable oil
1 tsp vanilla extract
1/2 cups chunks of chocolate (dark or milky, it's your choice)


Preheat oven to 180C.
Sift flour, cocoa, salt, baking powder and baking soda into a large bowl. Mix in sugar. Add the eggs, water, buttermilk, oil and vanilla and mix till smooth with a wooden spoon. Fold in the chips.
Fill cupcake liners with batter (only 2/3 full) and bake for 20 mins or till cake tester comes out clean.  Cool cakes completely before frosting.


Nutella Cream Cheese Frosting
226g cream cheese
50g softened butter
50g nutella
1/4 cup icing sugar, sifted


Cream the cheese and butter till smooth. Add sugar and nutella and mix until well incorporated.


Monday, January 2, 2012

Checkmate!


This was my first attempt at making checkerboard cookies and as you can see, they're far from perfect, appearance-wise. I certainly wasn't going to serves them to anyone other than my husband, who is often the unsuspecting victim to my kitchen foibles. This time though he surprised me by gobbling up much of the cookies at one go. I guess he isn't one who goes for appearances ... err, good to know but what does that say about me? Hmmmm...

Back to the cookies. What you need is precision and attention to detail, two things I sorely lack. What you need to do is make a basic cookie dough, divide it in half, flavour one with cocoa powder and toll them both out into identical 7-inch squares (identical in size and thickness) and then cut the squares into exact strips, about 1/2 cm wide (or slightly less). Here's where I failed. I didn't roll my chocolate dough thin enough and my strips weren't all 1/2 cm wide. The result? Imperfect squares in the checkerboard. 


But all is well. I've resolved to be less uptight this year (one of my many new year resolutions that I intend to keep) and I'm not hung up over the aesthetic imperfections of my cookies. They're homemade not gourmet,  and therefore it's fine that they're rustic (that's what I'm calling them, ok). 

The appeal of the cookies isn't just aesthetic. The combination of vanilla and chocolate is a winner and, if you add finely chopped nuts into the dough, you're in for a treat.


Martha's Checkerboard Cookies
225g butter, softened
1/2 cup sugar
1 tsp vanilla extract
1/4 tsp lemon extract (optional)
21/2 cups all purpose flour
1/4 tsp salt
3 tbsp cocoa
1 egg beaten + 1 tbsp water

Cream the butter and sugar till incorporated. Add the vanilla and lemon extracts and mix. Turn the mixer to a slow speed and gradually add in the flour (mix in the salt to the flour first).

When the dough comes together, gently knead it for about 3-5 mins and then divide the dough into two equal halves.

Mix in the cocoa to one half of the dough until it's well incorporated. 

Roll each ball of dough in between two sheets of plastic into two identical 7-inch squares (thickness of about 1/2 cm thick). Using a sharp knife, slice each square into 1/4 cm wide strips. 

Whisk the egg and water and keep aside.

Cover your work surface with plastic. Place three strips of dough on the plastic, close together (white, chocolate, white). Brush the top of the strips with the egg wash and repeat this time starting with the chocolate strip (chocolate, white, chocolate). Brush the top with egg again and repeat (white, chocolate, white). 

Wrap the block (with the three layers) with the plastic and refrigerate.

Repeat with the remaining dough.

Chill the blocks for 30 mins. Preheat the oven to 180. Bake for 10-12 mins.


Friday, December 23, 2011

Chocolate Spritz Cookies


How does one misplace an ingredient? Well, these chocolate cookies were supposed to be green — as in flavoured with green tea powder. But, for the life of me, I couldn't find the tin of matcha green tea powder I had purchased in Japan some time ago. I literally cleaned out my kitchen shelves looking for the darn thing. Where'd it go? If I didn't know better, I'd think my kitchen pantry was haunted. Oh well.

Since I'd taken out my butter to cool and measured all the other ingredients for these cookies, I decided to replace the green tea powder with cocoa powder instead — at least I knew where the cocoa was.

Scatterbrain, you say? Well, you're absolutely right. Still, the cocoa was a good substitute and these spritz cookies — made with my mum's old cookie press — turned out well.


The recipe is courtesy of Martha Stewart — she has a basic dough recipe for spritz cookies and also variations depending on the flavour you hope to achieve: citrus, chocolate, spiced or just plain vanilla. She also suggests various glazes for the cookies which I chose to forgo the glaze time around — the stress of hunting down the green tea powder left me a little winded. Yes, of course I am exaggerating. 

A spritz cookie is ultimately a butter cookie that's made using a cookie press. The term 'spritz' comes from the German word 'spritzen' which is to squirt. well, the cookie press doesn't exactly squirt out cookies but you get the idea, right?


A cookie press (see pic above) is a cylindrical device made of stainless steel (the more modern ones come in plastic). It comprises a barrel to hold the dough, a stainless steel lever/trigger that 'squirts' out the dough and a set of shape-discs that determine what shape your cookies take: the shapes include pretty wreaths, flowers, trees, rosettes, stars, and stripes, hears and many more. Pretty neat!

For the dough to go through the discs, the consistency has to be a little softer than the dough you use for cut-out cookies. And, it has to be chilled first.

I had a blast playing with the different shapes and decided to garnish them with desiccated coconut because I love coconut.

FYI: If you don't have a spritzer, just add 1 tsp baking powder and scant 1/3 cup four to the the same recipe and you can make cut-out cookies with them. 

Chocolate Spritz Cookies
22/3 cups all purpose flour
1/3 cup cocoa
1/2 tsp salt
228g unsalted butter
1 cup sugar
1 egg
2 tsp vanilla extract

Whisk the flour, cocoa and salt in a large bowl.
Beat the butter and sugar in a mixer (medium-high speed) until light and fluffy. Add the egg and vanilla and mix until well incorporated. Reduce speed to low and add the flour gradually and beat till combined.

Refrigerate dough for at least 20 minutes before filling the spritzer with dough. Spritz the cookies straight onto a lined baking sheet, about an inch apart, and bake for 12-14 mins. Let cool completely before storing (or eating) them! 

Thursday, December 8, 2011

Choc-onut candy?


That chocolate and coconut go together wondrously is no secret.  All you gotta do is gnaw at (or chomp down, if you are like me) a Bounty bar or have at a lamington (squares of chocolate-coated sponge cake rolled in dessicated/flaked sweetened coconut) to realise that chocolate and coconut, when combined, is just divine.

So, on a particularly restless evening some weeks ago, I decided to try and determine if the choc-onut pairing would work also work in a favourite Malaysian dessert: coconut candy. Now I was aware that I was treading into dangerous waters because a true fan of the classic Malayisan (yes, I am claiming it to be Malaysian) coconut candy doesn't tolerate the bastardisation of the classic recipe.

As a rule, coconut candy must be either pink or green: the more garish the colours the better (see below). Also, the flavour should be pure coconut enhanced only with vanilla or rose essence.


So, seriously, I was a little nervous about messing with a classic. But curiosity always gets the better of me and so I pressed on.

I didn't have a recipe to go by and so, it took some experimenting to find the right amount of cocoa for the candy to be just right.

The first batch I made was weak. I was too stingy with the cocoa and as a result the chocolate flavour wasn't apparent at all and the colour was unappealing too; kinda sandy brown. Unacceptable!

I decided to be bold with the second batch and doubled the amount of cocoa I used. It worked. The taste of chocolate was very apparent and the candy looked like a brownie. Well, kinda.


The verdict? I loved the choc-onut candy as did many of my friends whom I made sample it. Would I try it again? Yeah! Would they try it again? Well, yes but only if I also serve them the original.

"It's lovely but I will always feel a little unfulfilled unless I have a garishly pink or green piece along with this one," was the consensus.

Choc-onut candy
3 cups grated coconut
450g castor sugar
170g evaporated milk
40g butter
1/4 cup cocoa
pinch of salt
1 tsp vanilla extract

Grease a small baking tray with butter.

Place the coconut, sugar, salt and milk in a wok over low heat and stir until the sugar dissolves. Add the butter and then the cocoa. Stir to incorporate both ingredients and then keep stirring  as the mixture thickens so that the bottom doesn't get burnt.

The tricky [art about candy is knowing when to take it off the heat. Take it off too early and your candy will be damp and maybe even a little soggy. Leave it on too long and the candy crumbles. The secret is to watch closely and remove it once the candy starts to stick together and when you stir it with a wooden spoon, it comes together in a ball. Well, sort off. It will be a little wettish still but don't fret, it will harden as it sets.

When the texture is right, remove the candy from the heat onto the greased tray. Using a sheet of foil, press it into a flat layer about 1 inch thick. Compress it well and level the top with a bowl or the palm of your hand.

Leave it to set for an hour or longer. If you want, you may serrate the block of candy by gently running a knife through the wettish layer (so it will be easier to break up or cut up later) but this isn't necessary. 


Related Posts with Thumbnails